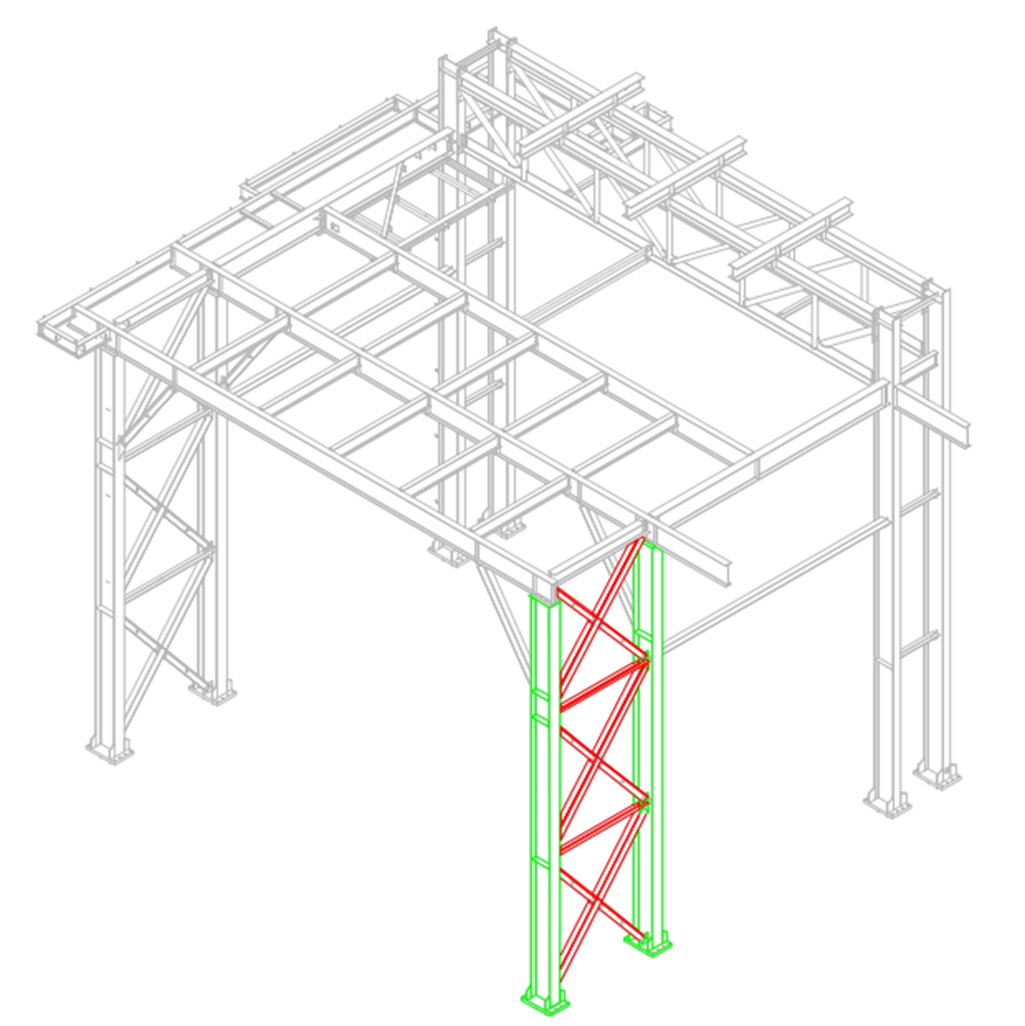
Daily Plan from Scratch
Today, your crew is installing two columns of the Support Steel Structure 1 (green columns). Your plan for tomorrow is to install the horizontal and cross member assemblies (red cross bracing).
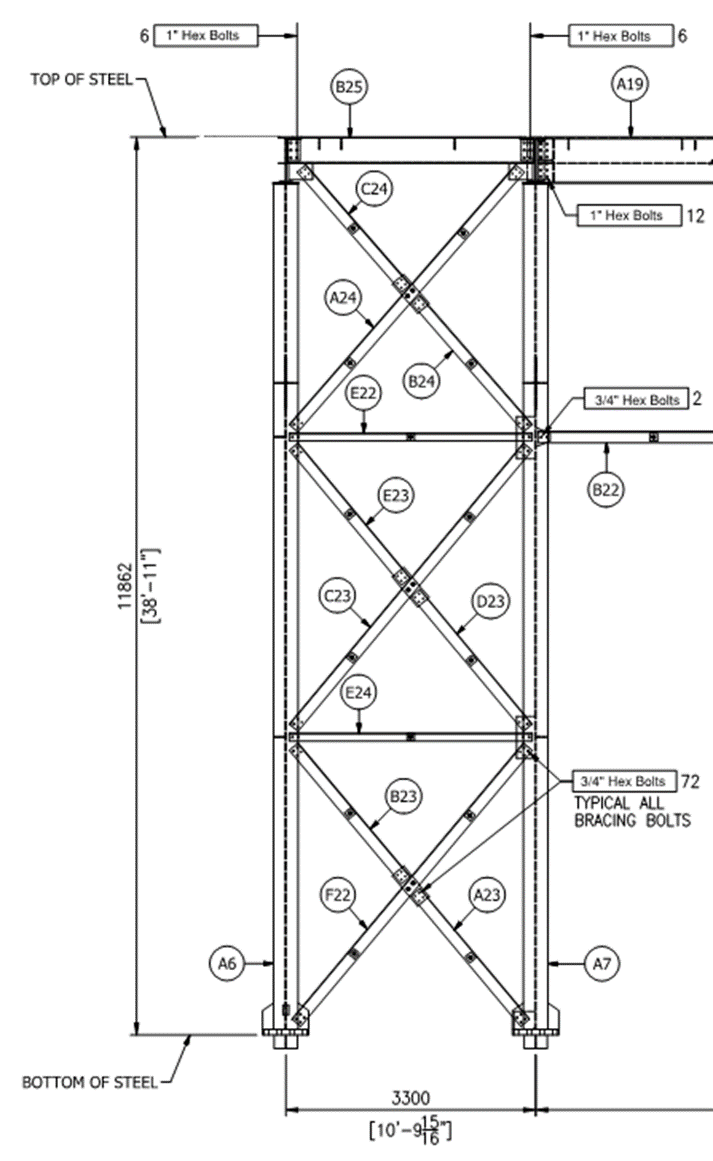
The steel members you will be installing are:
-
A23
-
A24
-
B23
-
B24
-
C23
-
C24
-
D23
-
E22
-
E23
-
E24
-
F22
The plan for our crew tomorrow will be to shake out and transport the steel members by truck to the work area. We will also plan to erect and bolt up members C23, D23, E23, and E24. We will use a JLG to help with erection.
A plan is a list of steps that includes the time and resources (labor and equipment) that is used to achieve a goal or objective.
In InEight Progress Mobile, you can create a plan from scratch, if there is no existing plan to use that was previously created on the project. A plan can be created by either a foreman or an engineer.
Plan Creation
To create a plan from scratch, you are required to provide:
-
The date the plan will be executed
-
The approver of the plan (normally the originator of the plan, such as a field engineer or superintendent)
-
The executer of the plan (normally the overseer of the work, such as a foreman)
You must provide a date of when the plan will be executed, select an approver, and select an executer when you create a plan from scratch.
If an executor or approver is removed from the project, an error will appear in the Progress Mobile application prompting you to replace them on your daily plan.
Some projects or organizations may choose to not require an executor which is a setting that can be changed in the project settings. Refer to the Progress Admin User Guide for more information on settings.
After logging into the Progress Mobile app, you will land on the Projects home page where you can select one of your assigned projects.
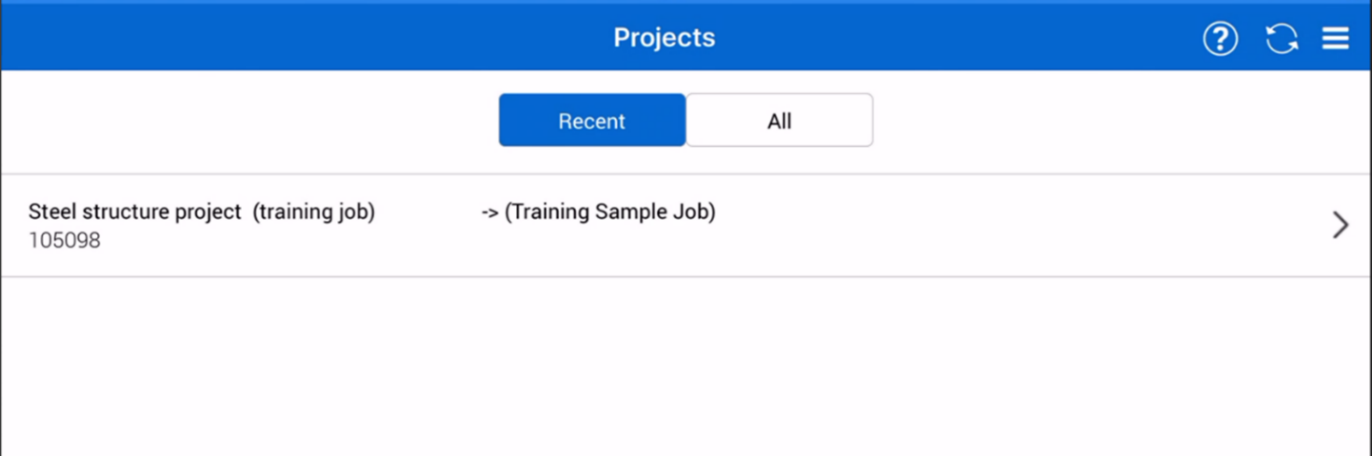
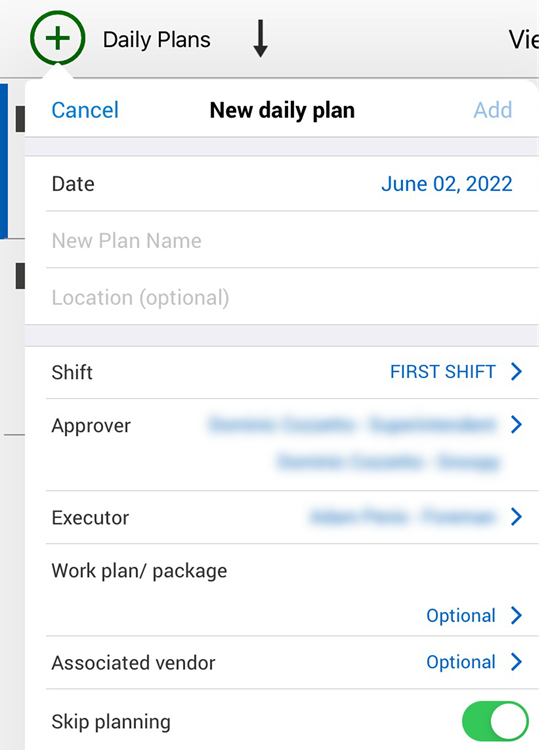
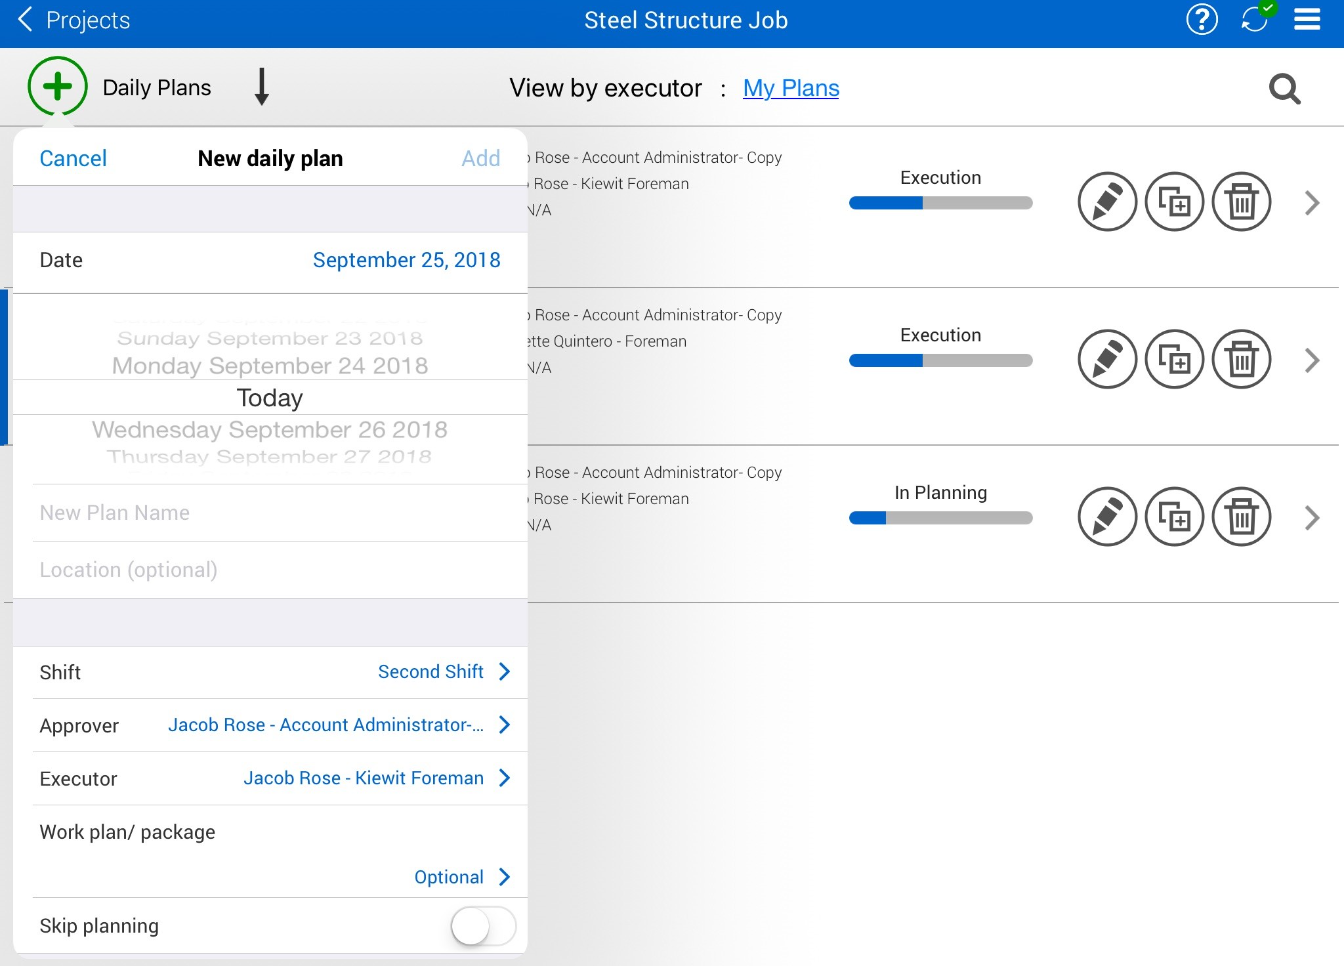
When you select the project you want to create a daily plan for, you will open the Daily plans page, where you will see the Add button.
The Add button opens a slide out panel from the left where you can provide a plan description, location and date. You can also select an approver, executer, Work plan/package ID, and associated vendor. When you have completed the plan information, you create the plan by selecting Add in the top right corner.
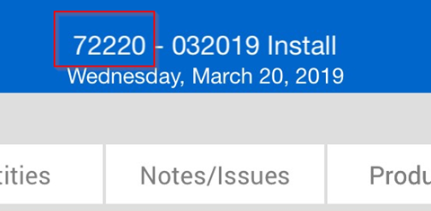
Daily Plan ID
When you create a new daily plan in the Progress Mobile application, the daily plan ID will be pending until it is synced with the Progress Web application. Once a daily plan ID is assigned to the plan, it will be visible along with the plan description at the top of the screen.
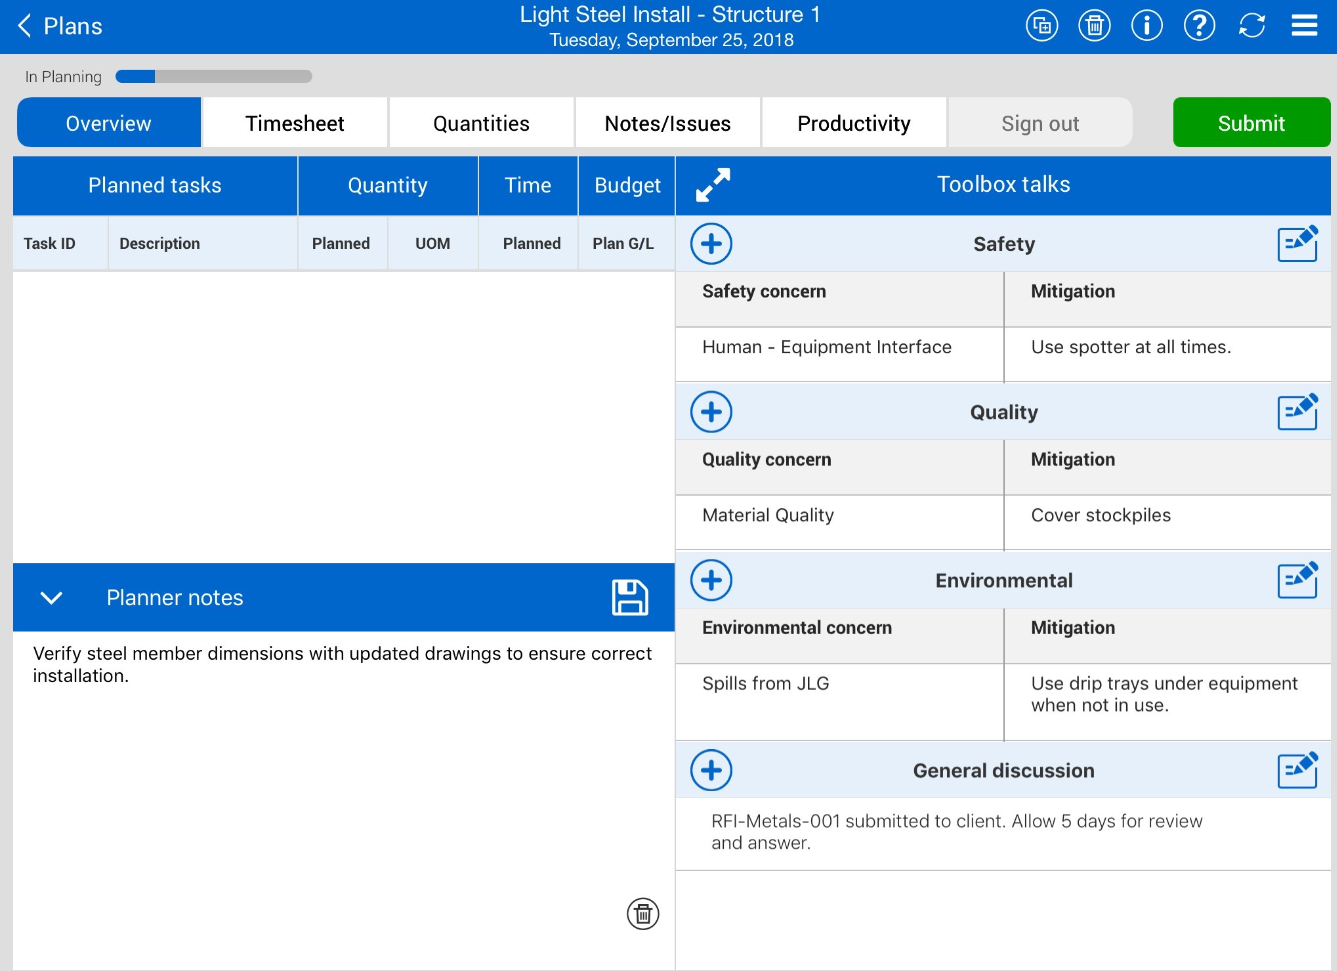
Once you create your plan, you will open to the Overview tab of the plan where you can enter information such as Planner Notes, Safety, Quality, Environmental, and General Discussion notes. To review or edit this initial information from any screen, you can select the  icon.
icon.
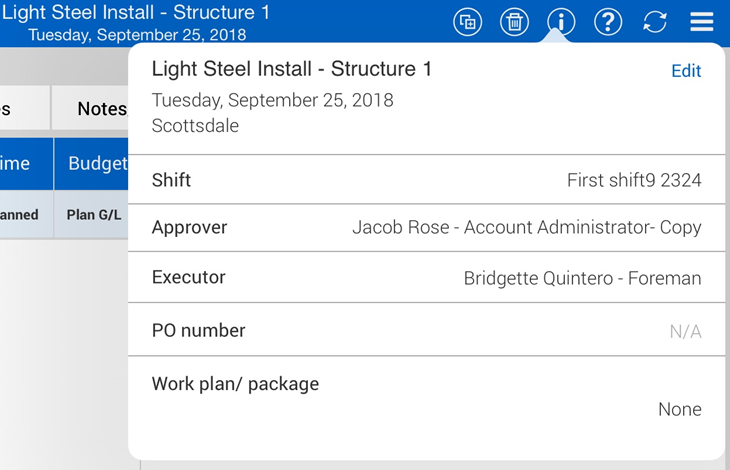
Overview Tab
After you create a plan, within the Overview page you can provide key plan information, including:
-
The safety information pertaining to the Operation
-
Quality concerns or required hold points
-
Environmental concerns regarding your work or the area near your work
-
Other notes regarding best practices
These notes become a reminder as you execute and review the plan, to ensure the required inspections for a particular section of your work are completed.
Within the General Discussion section is a note field, where you can include information to talk to your crew or foreman about, that doesn’t fit in the three major categories: Safety, Quality, and Environmental. Examples include:
-
A pending RFI requires a response from the engineer in order to perform a section of work due to a design conflict
-
A reminder of material requisition that you need to complete for upcoming work
Aside from entering notes, you will be able to view your planned tasks information on the Overview tab after you enter your resources, quantities, and time into the other tabs.
Timesheet Tab
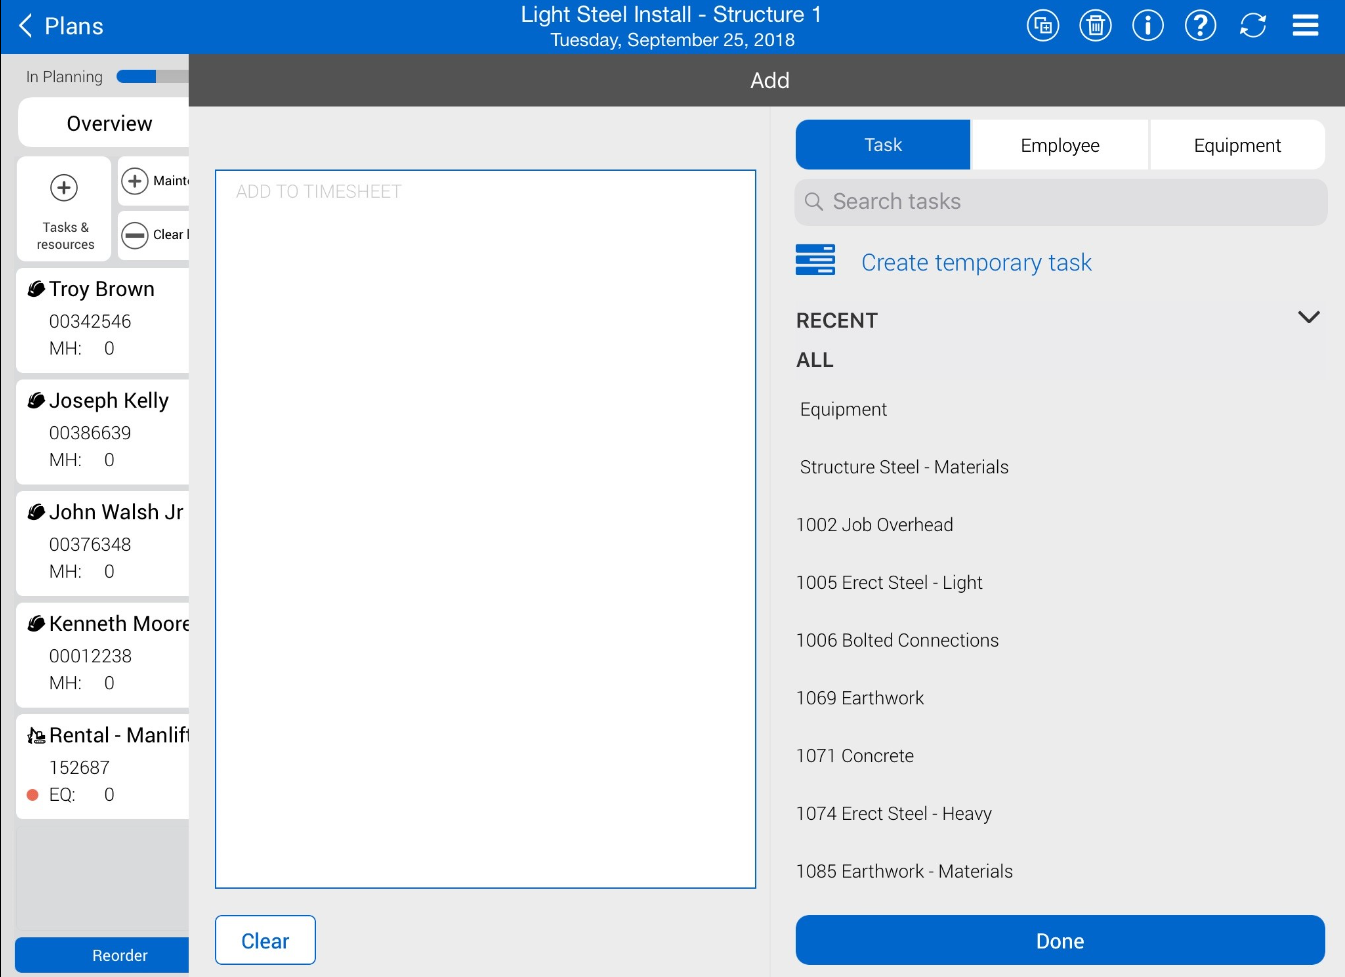
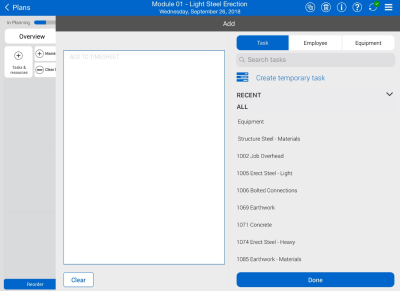
Add Tasks
The key aspect to planning work is the task or objective that needs to be completed. You add tasks under the Timesheet tab. Tasks are scopes of work that equal one cost item or line in the overall project budget. They are the charge codes you will charge employee and equipment hours to. Tasks are designated by a unique WBS number which is established in InEight Control and can vary greatly from company to company based on how you standardize cost coding structures..
Add Employees and Equipment
Part of planning the work includes planning the work hours for your labor and equipment resources to accomplish each task.
On the Timesheet tab, the foreman and/or engineer plans how long each crewmember and piece of equipment will be used to perform a specific task in your plan to maximize the crew’s productivity and reduce cost, so there is no equipment standing by or crewmember roaming around with no work to perform.
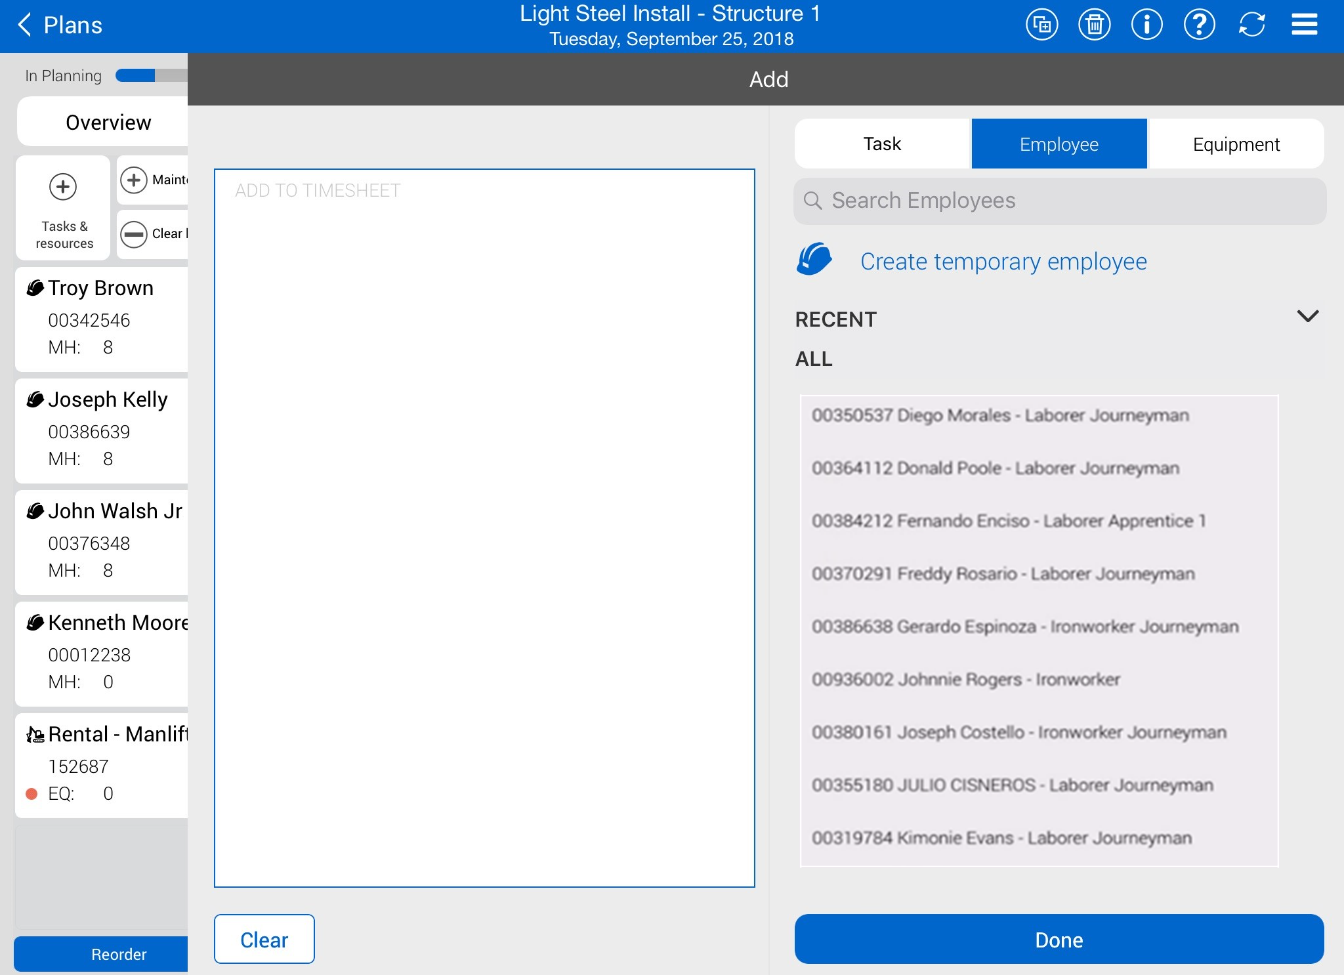
You can select employees from the projects list or add a temporary employee. For the equipment, you can select from the projects list or add a temporary piece of equipment.
You can add employees and equipment only if the plan date is within the resources' project start and end dates. These dates are managed in your project’s Assigned operational resources page.
If you change project employee or equipment dates after they are already added, and the plan date is outside the new project employee or equipment dates, an inactive employee or equipment icon is shown.
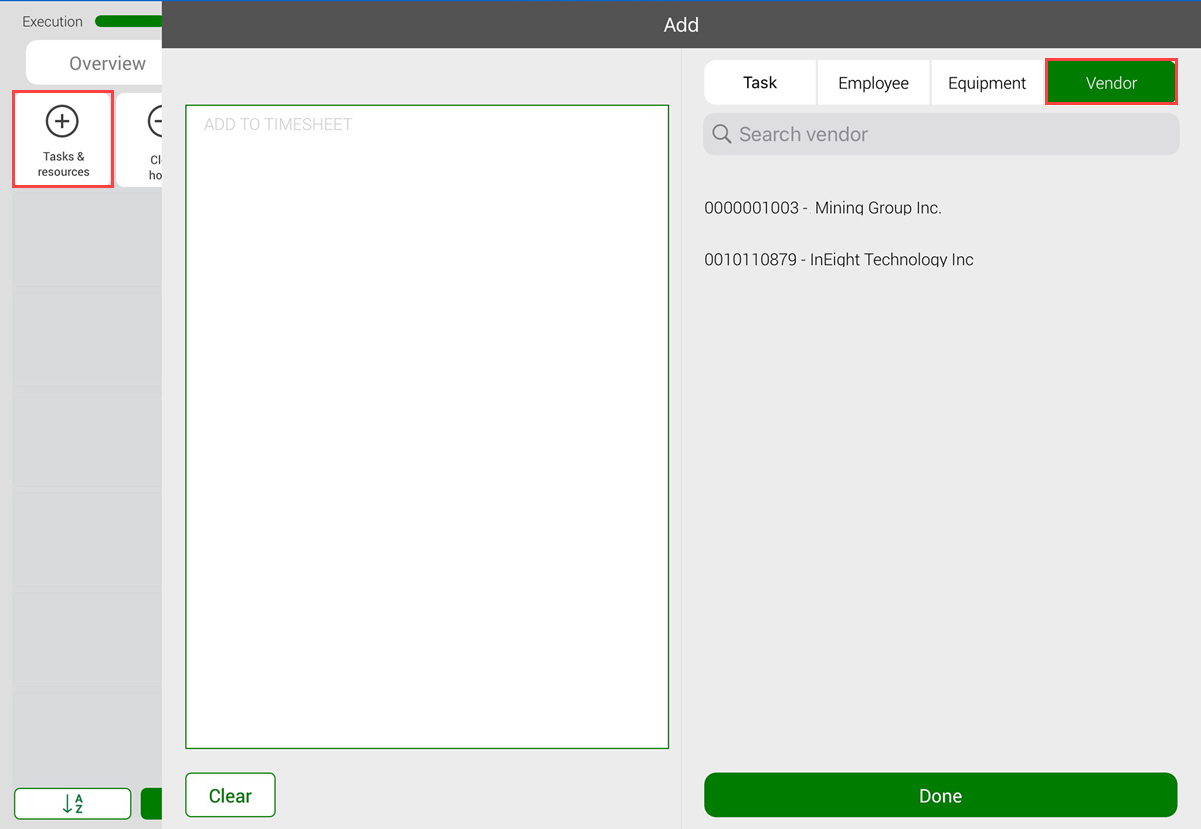
Add vendors
If your project has vendors who are completing work, you can add the vendors to a timesheet to assign labor hours directly to the vendor and enter the number of vendor employees who worked. Vendor data comes from InEight Control, where you assign vendors to individual cost items to indicate that a certain scope of work will be completed by a third-party vendor.
To add a vendor to the timesheet, tap Tasks and resources, and then tap Vendors in the slide-out panel. Select vendors from the left side of the panel, and then tap Done.
Temporary Employees and Equipment
As you are going through the list of equipment for your project, if you cannot find the right equipment for the operation, you can create a temporary piece of equipment in InEight Progress. To create a temporary piece of equipment you will need to have a Temporary Equipment ID and Name.
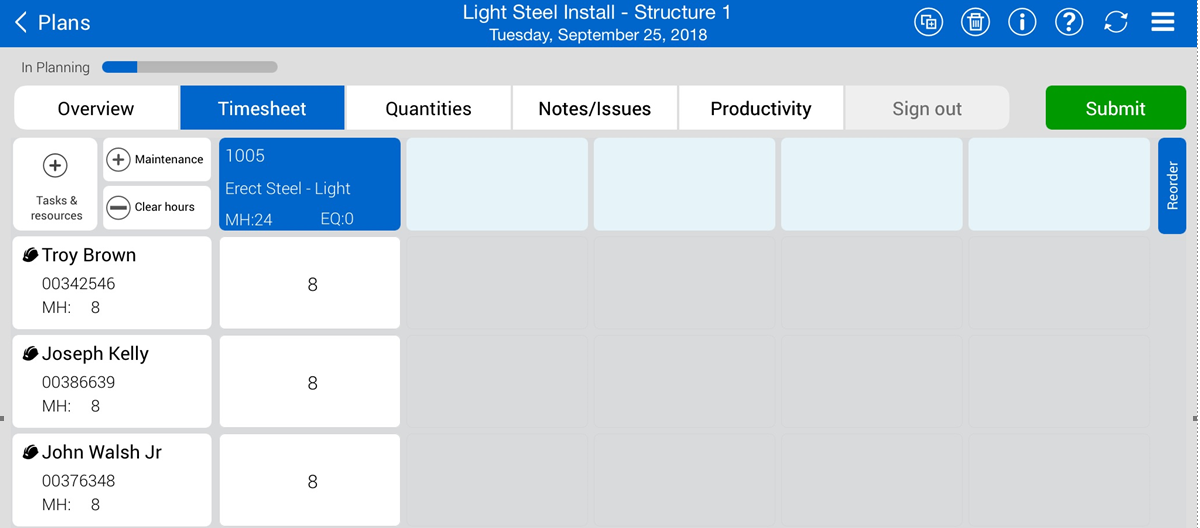
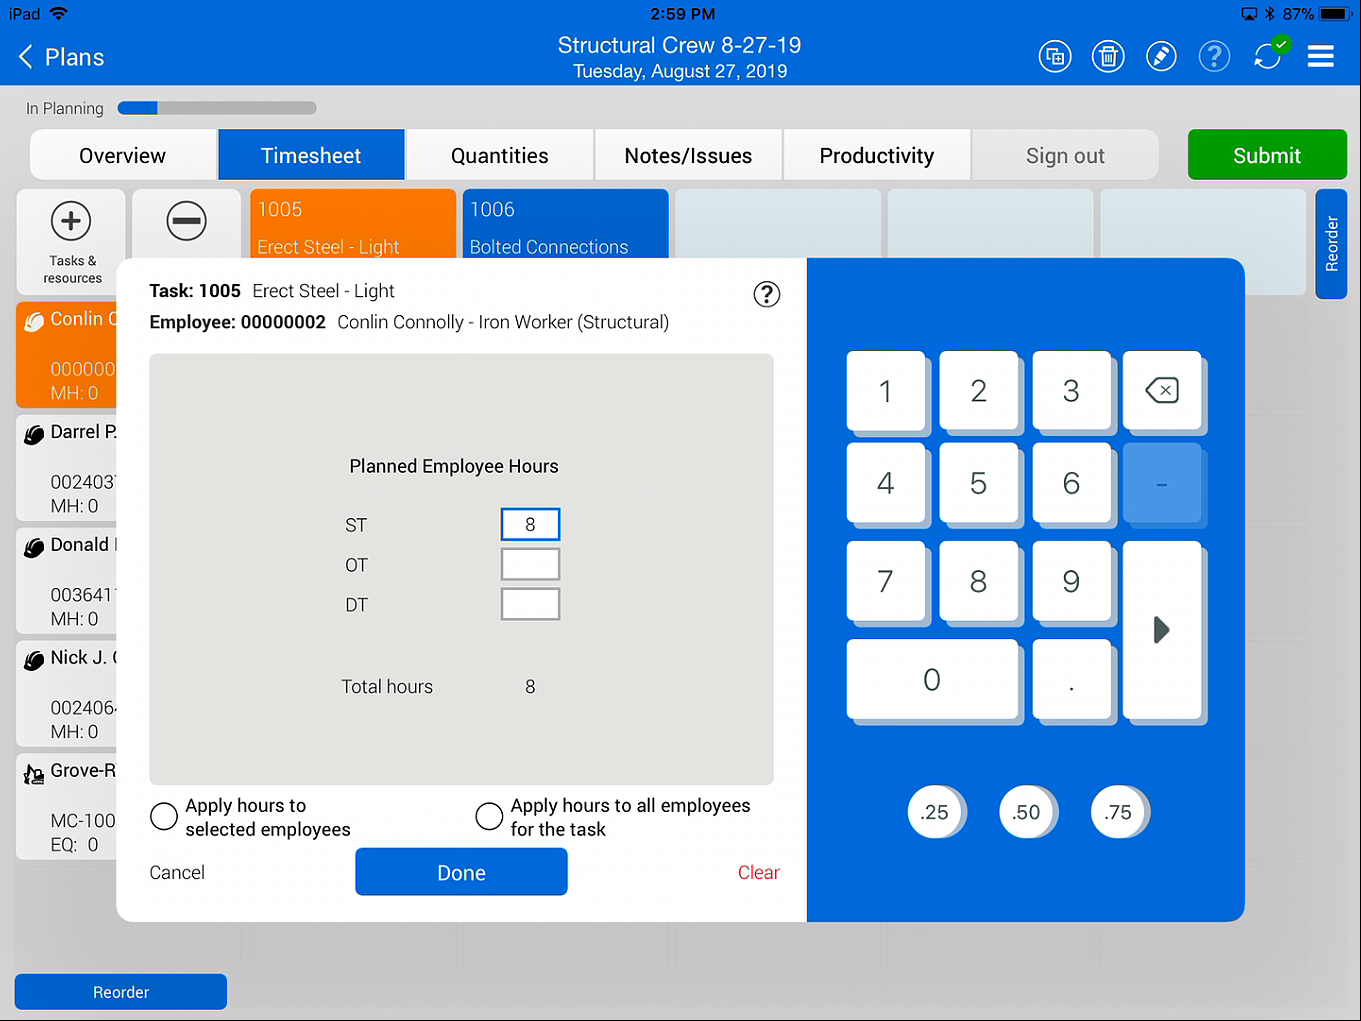
Add Hours
After you add tasks, labor, equipment, and vendor resources to the project, you can add time to the tasks and resources.
-
Time units are in hours
-
You can plan the work for straight time, overtime, or double time
-
To enter hours, you tap on the hour box
-
If you want to apply the same hours to other selected employees, you can select the Apply hours to selected employees option
-
If the planned hours for all employees will be the same, you can select the option Apply hours to all employees for the task
-
If you select the ? icon, you can bring up the help screen
-
If you are adding hours to a vendor resource, there is an additional Number of employees field.
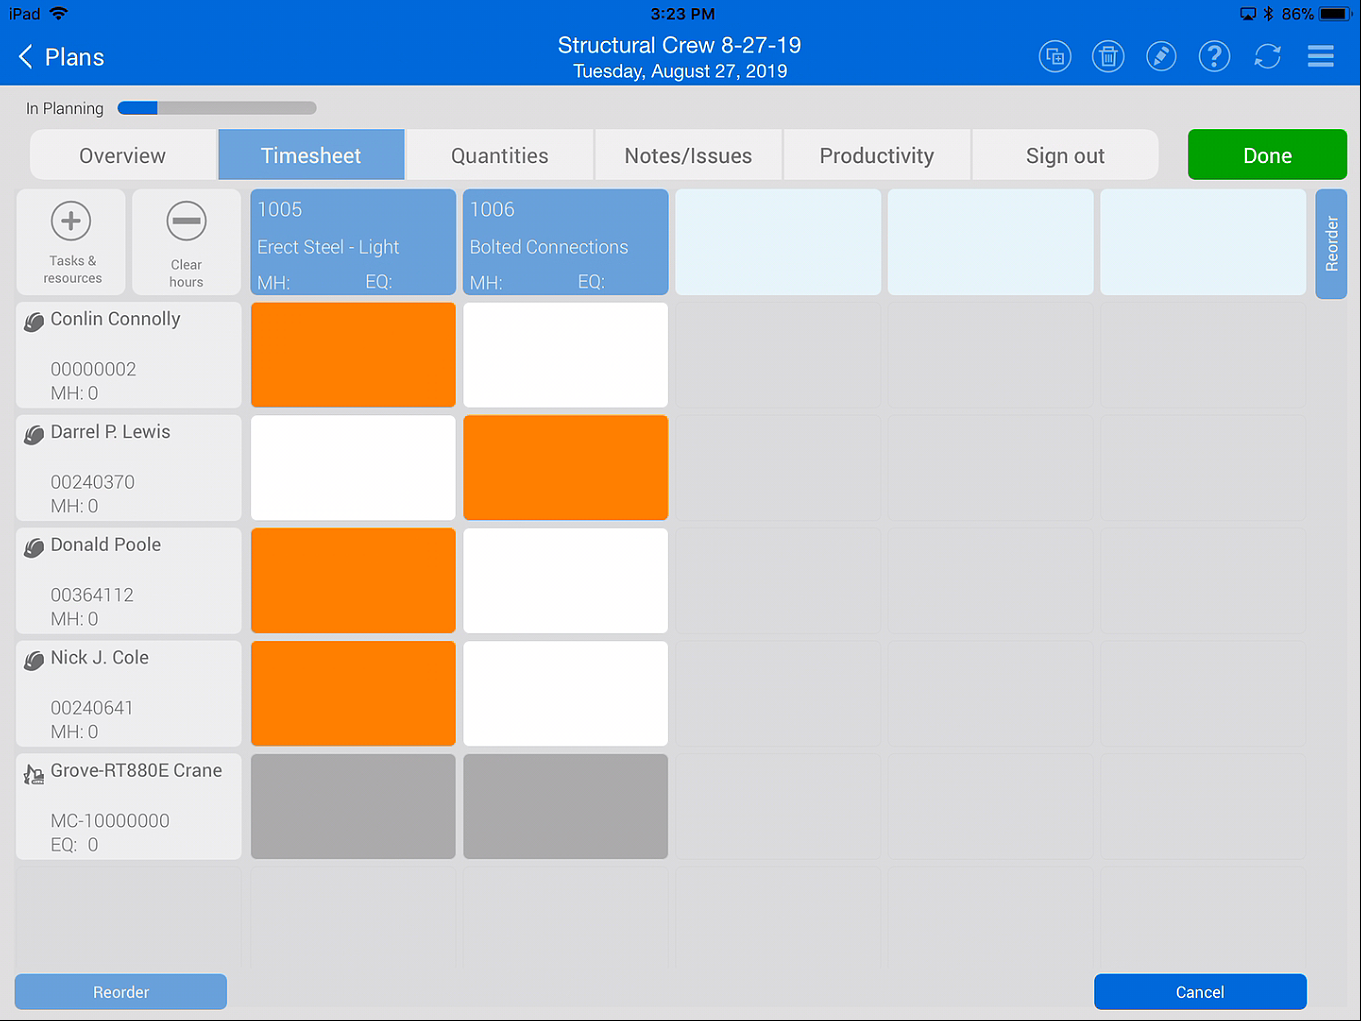
Apply Hours to Selected Employees
To save time, you can add hours to multiple employees at once. To do so, you would tap on the hours box for an employee and enter the number of hours you plan for them to work. You can then select Apply hours to selected employees.

The Apply Hours dialogue box appears with further instructions. You can check the box to not show the message again, to avoid it in the future.
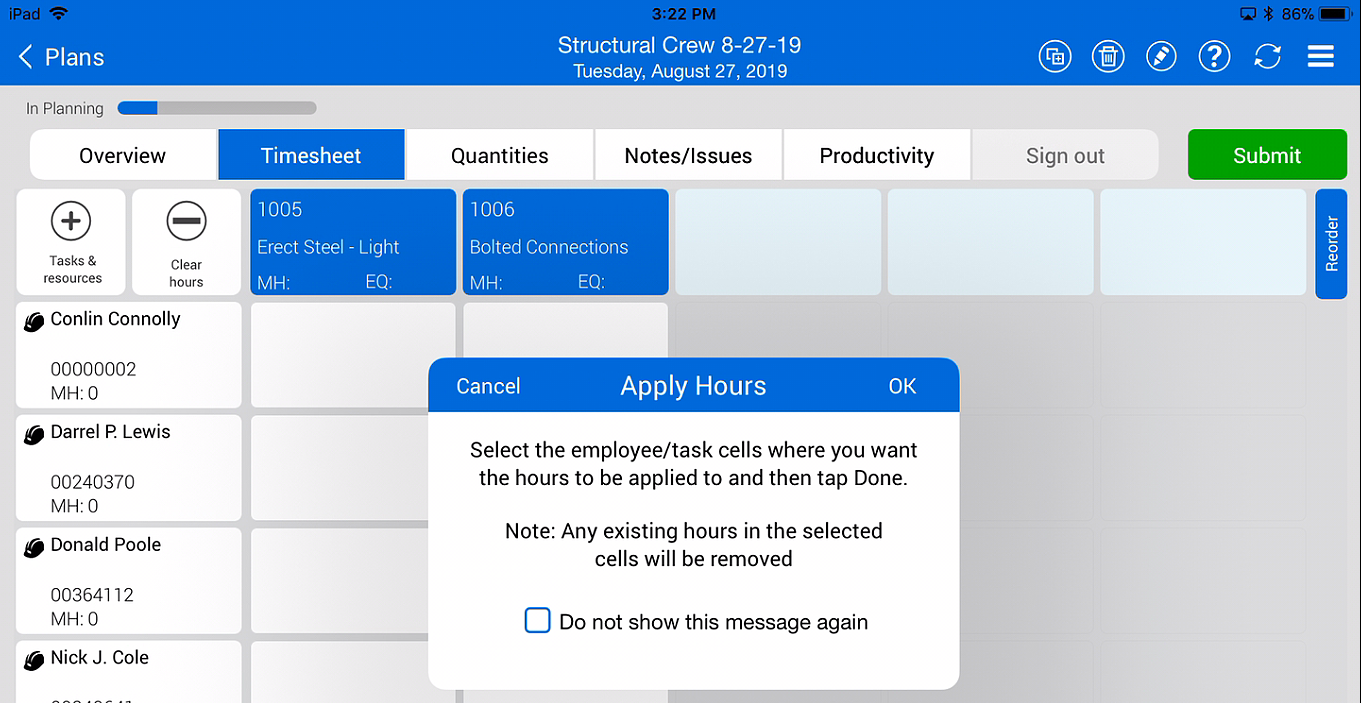
When you tap OK to close the dialogue, you can then select the hours boxes for all the employees you want to assign the same number of hours to, then tap Done.
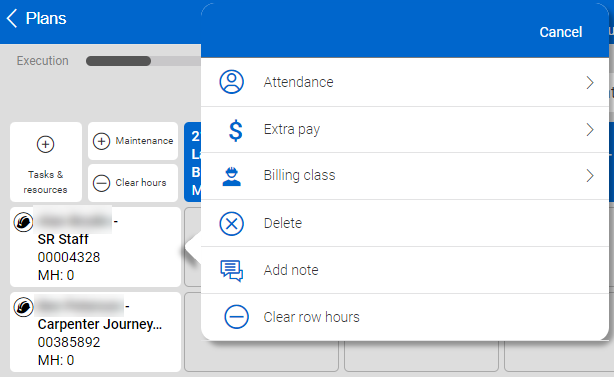
Additional Options
By tapping on the individual employee box, you will have the following options:
-
When you select Attendance, you can mark an employee present, absent excused – unpaid, absent excused – paid, and absent unexcused – unpaid
-
When you select Extra pay, you have the choice from none, premium, Foreman for the day, pay scale level change, and additional lump sum amount
-
When you select Billing class, you can override the employee's default billing class with a different billing class.
This change is only temporary. The employee's default billing class is not changed.
-
Add a note
-
Delete row
-
Clear row hours
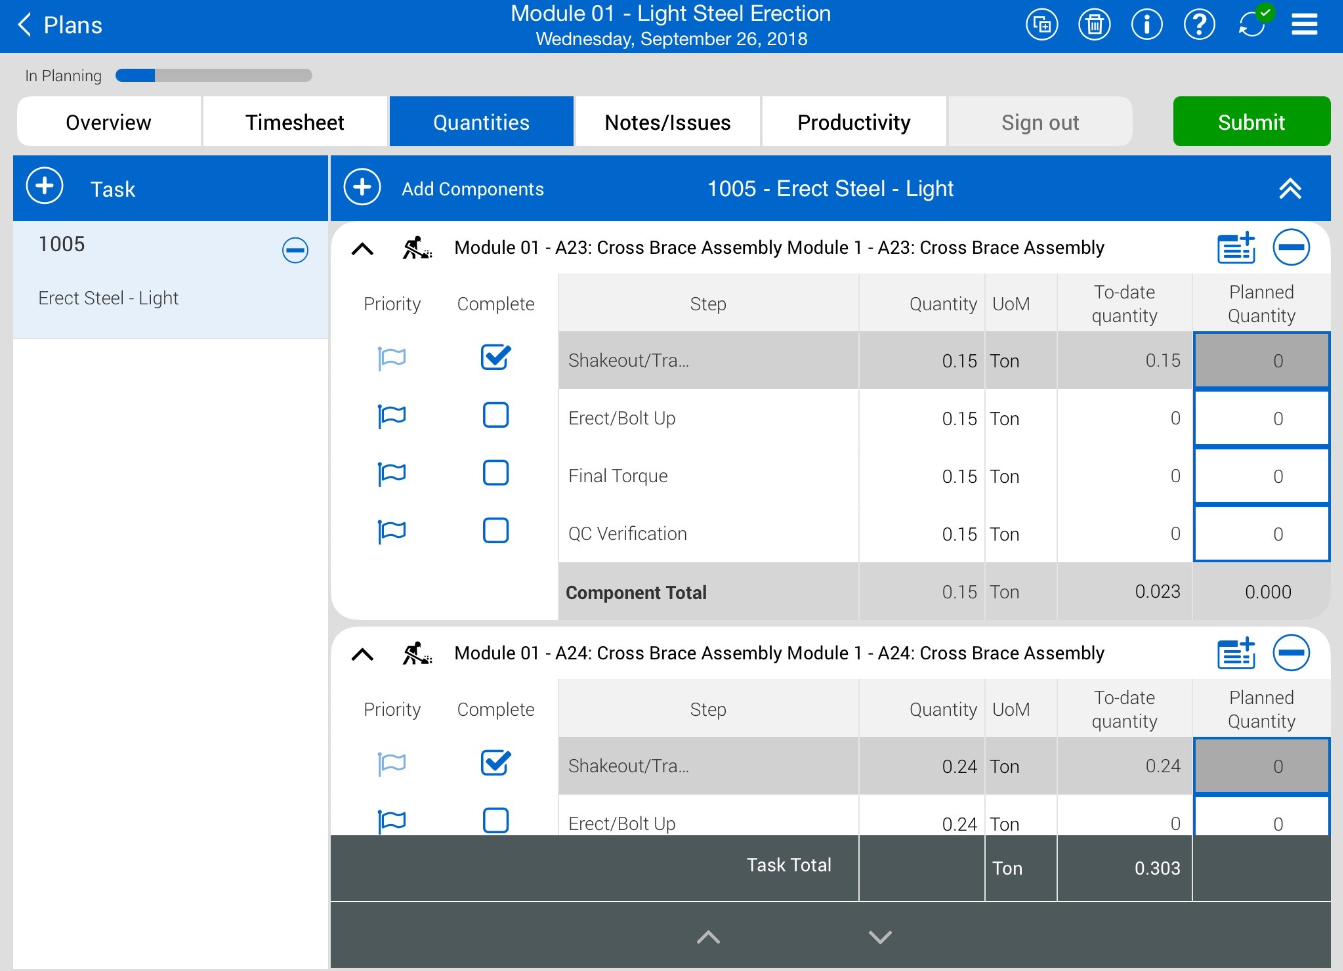
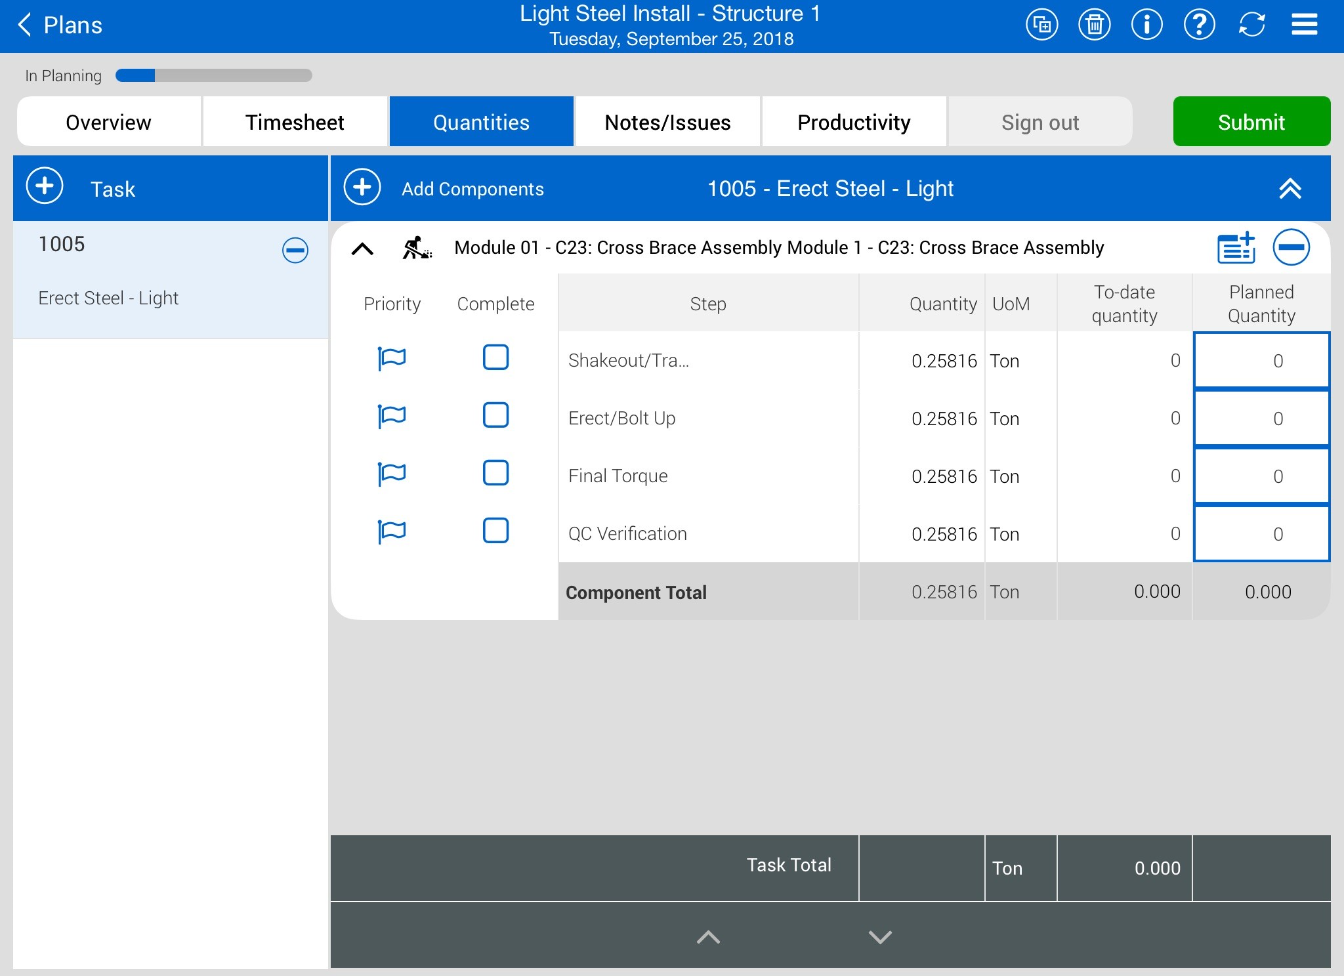
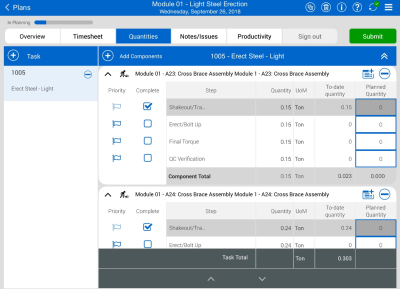
Quantities Tab
Progress pulls in quantity components associated to cost items from InEight Plan to the Quantities tab, where you can select the planned quantities to be completed.
Components
Components are portions of a cost item created to divide cost item quantities into manageable and identifiable tasks, so they are easier to track out in the field. A component can be a beam, light pole, systems testing for a switchgear, a jet fan, etc. Within the components, you will see a breakdown of steps for completing the component.
On the Quantities tab, you can add tasks from your project list or add a temporary task.
-
If you select a task from the project list, you will be able to see components loaded for that task, if they are associated with a Daily plan
-
If no work plan was associated, you can go back to the Daily plans page and add a work plan
-
If the Daily plan cannot be associated to any work plan, then within the Quantities tab, you can add a temporary component
There are several types of components:
-
Activity – Disciplines that show claiming schemes for physical work such as electrical
-
Denoted by

-
-
Material – Commodities that show claiming schemes for materials such as anchor bolts
-
Denoted by

-
-
Contract – Linked to Schedule of Value items in InEight Contract for billing validation.
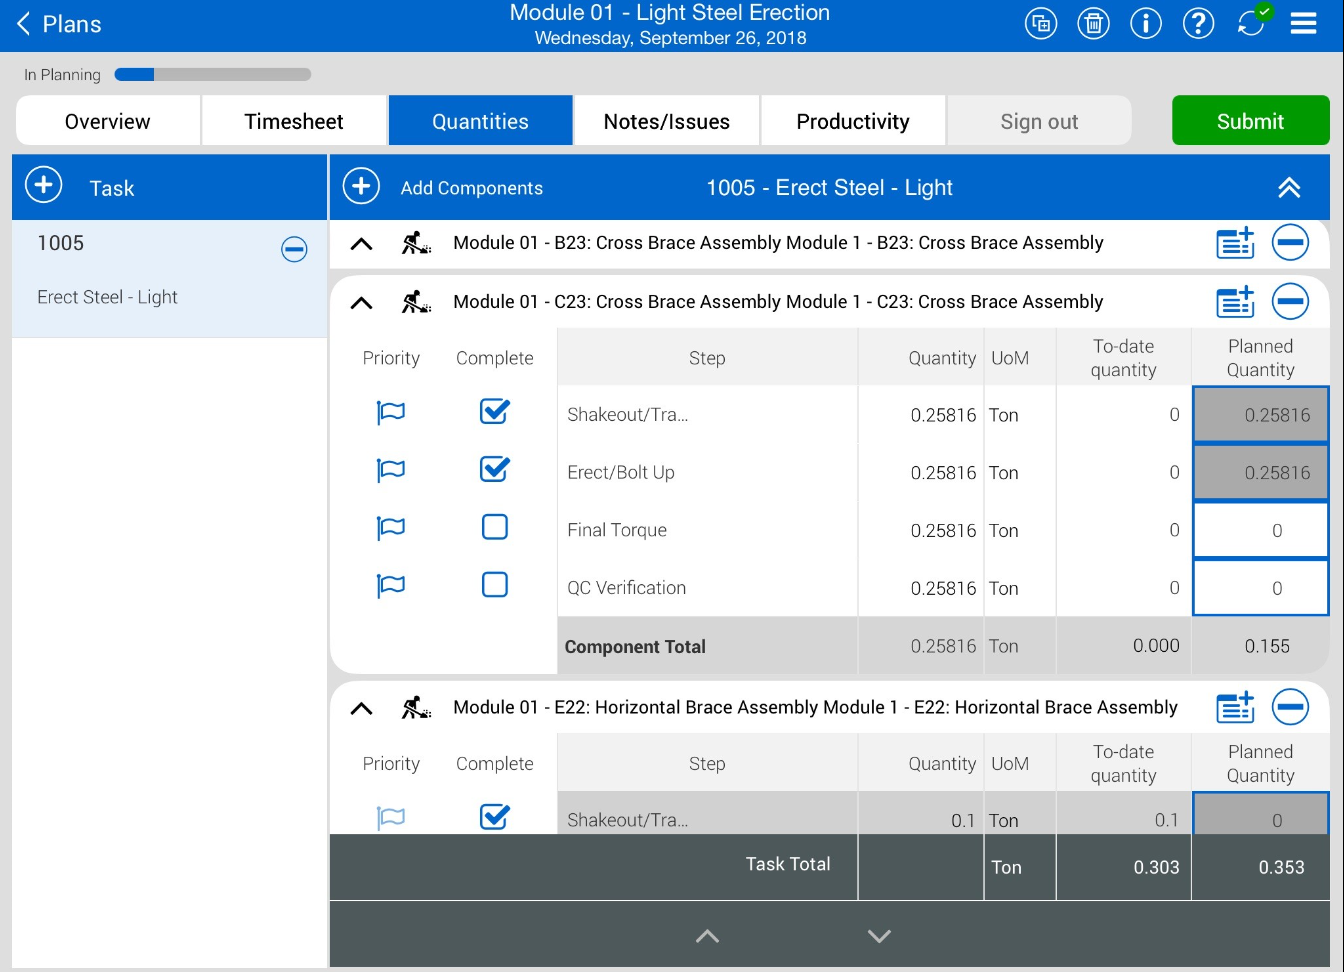
Planned Quantity
The planned quantity gives you an idea of what to work towards as a goal. Meeting the planned quantity goal will keep you on schedule with completing the task and let you know how much quantity should be complete by the end of the day.
Contracts
Contracts can be added to a daily plan so that you can add associated contract components to track for billing validation.
A contract must be associated with the same project and have schedule of value items to be available in a daily plan.
The following steps show you how to add a contract.
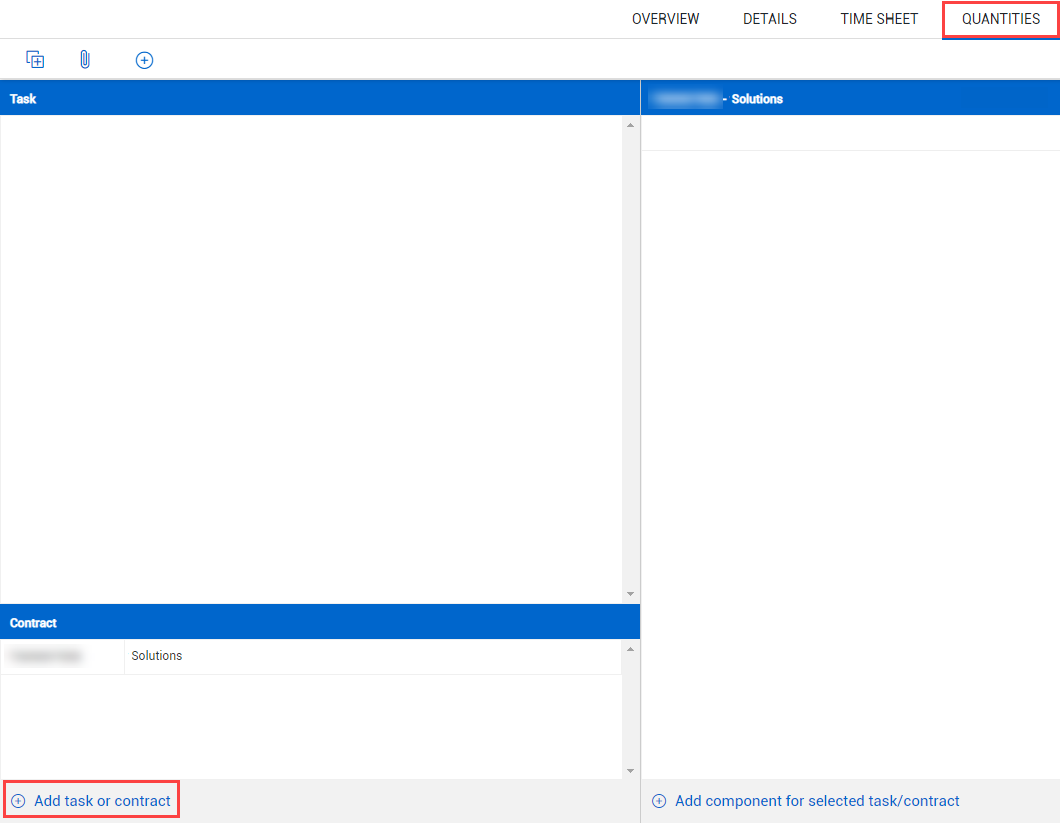
Step by Step — Add a contract to a daily plan
-
On the Quantities tab of a daily plan, click Add task or contract in the lower left of the page.

-
In the slide-out panel, open the Contract tab, and then select one or more contracts from the list. Selected contracts are moved to the Add to daily plan list.
-
Click Done.
After you add a contract, you can add any associated contract components in the Quantities tab.
Contract components
Contract components are used to track quantities for billing validation.
A contract component is automatically created from Contract when a schedule of values item for a contract is not set to hide in Plan and Progress.
The following steps show you how to add a contract component to a daily plan. You must add a contract to the daily plan before adding a contract component.
Step by Step — Add a contract component to a daily plan
-
Select a contract from the Contract list in the lower left of the Quantities tab.
-
Click Add component for select task/contract.
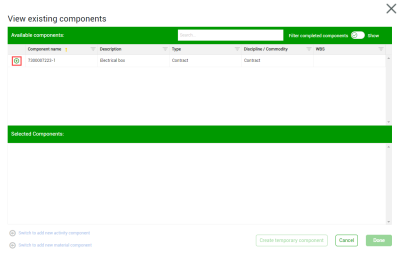
-
Select a contract component from the View existing components slide-out panel, and then click Done.

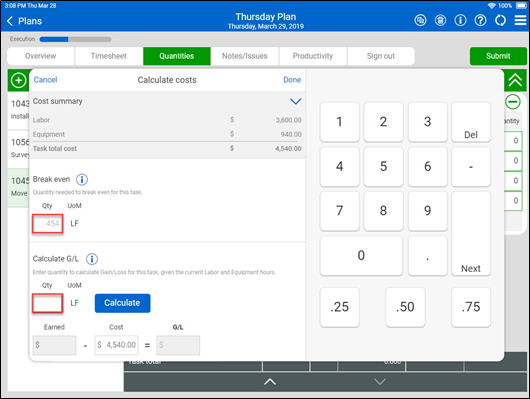
Planning Slide-Out
You can access the Planning Slide-Out by tapping on this icon in the Tasks column.
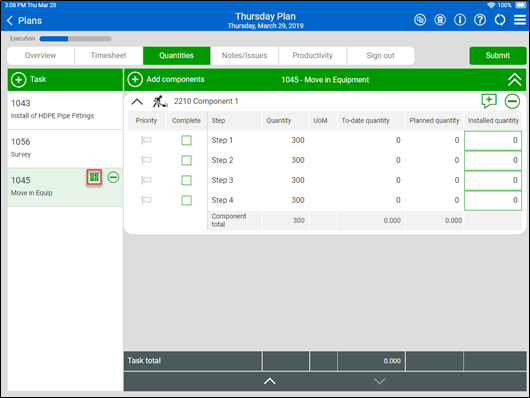
On this slide-out, you can view the quantity needed to break even for the selected task. Additionally, you can manually enter any quantity to see how it would affect the gain/loss for the selected task.
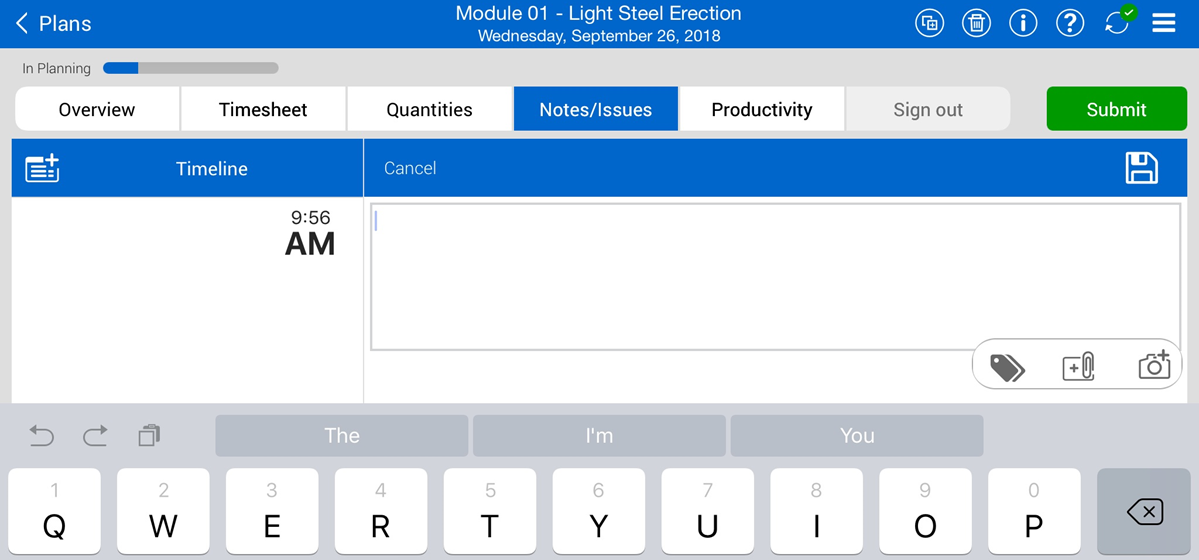
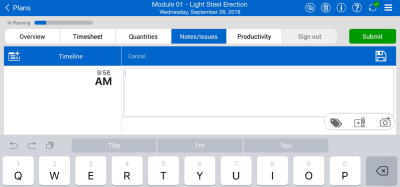
Notes/Issues Tab
The Notes/Issues tab is where you can note important information critical to your daily plan. If you forgot to note the information in the Overview tab, you can make notes in this tab, tag it to appropriate categories and they will appear in the Overview tab. Example notes include:
-
A permanent material needed as part of the installation work
-
A Request for Information involving a change in the design that impacts the installation and Daily plan
-
An environmental concern
-
Leave of Absence or extra pay for an employee
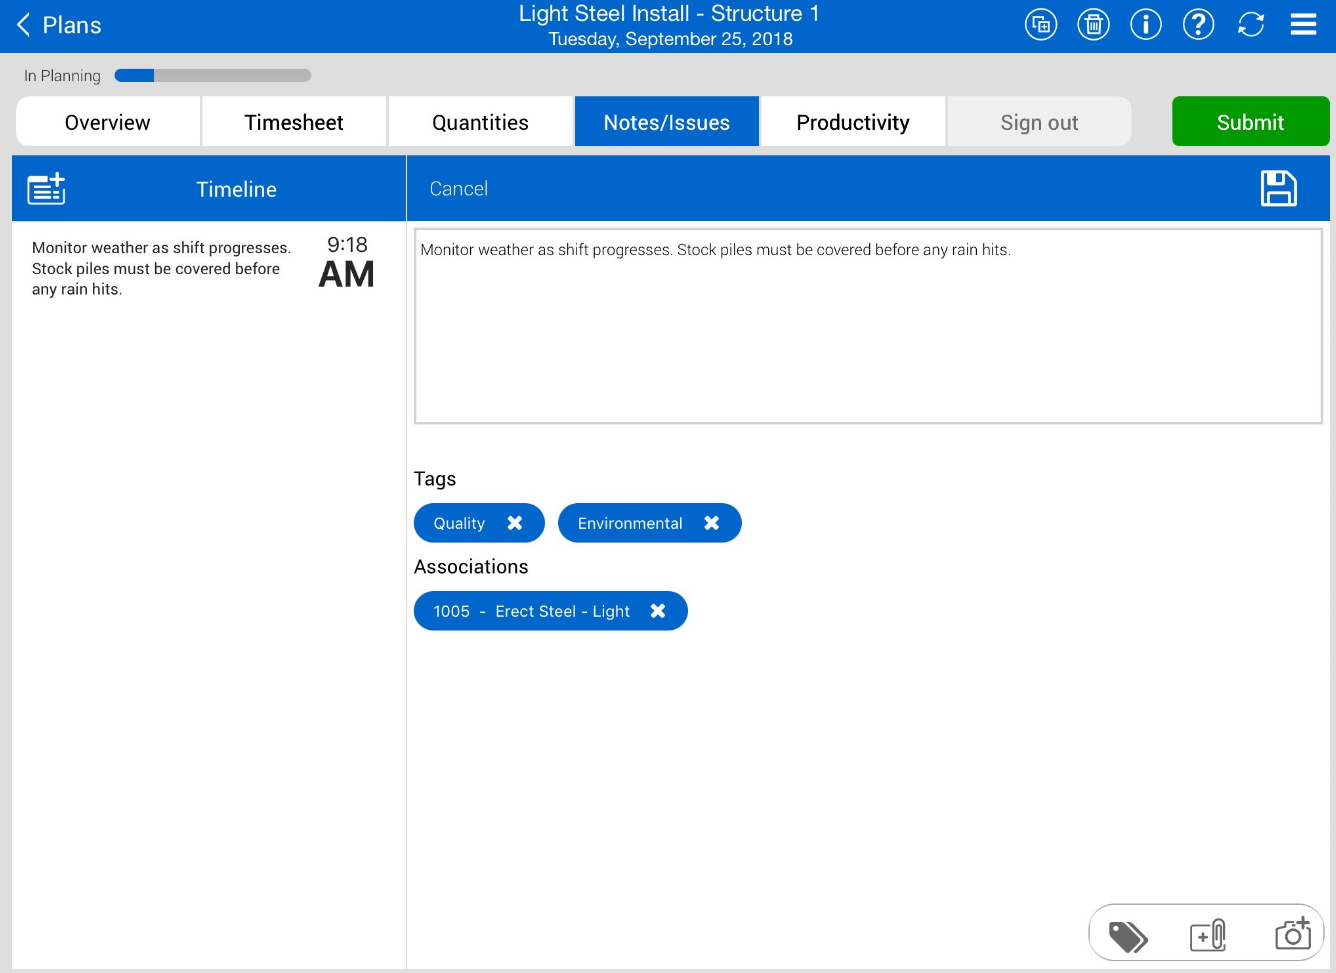
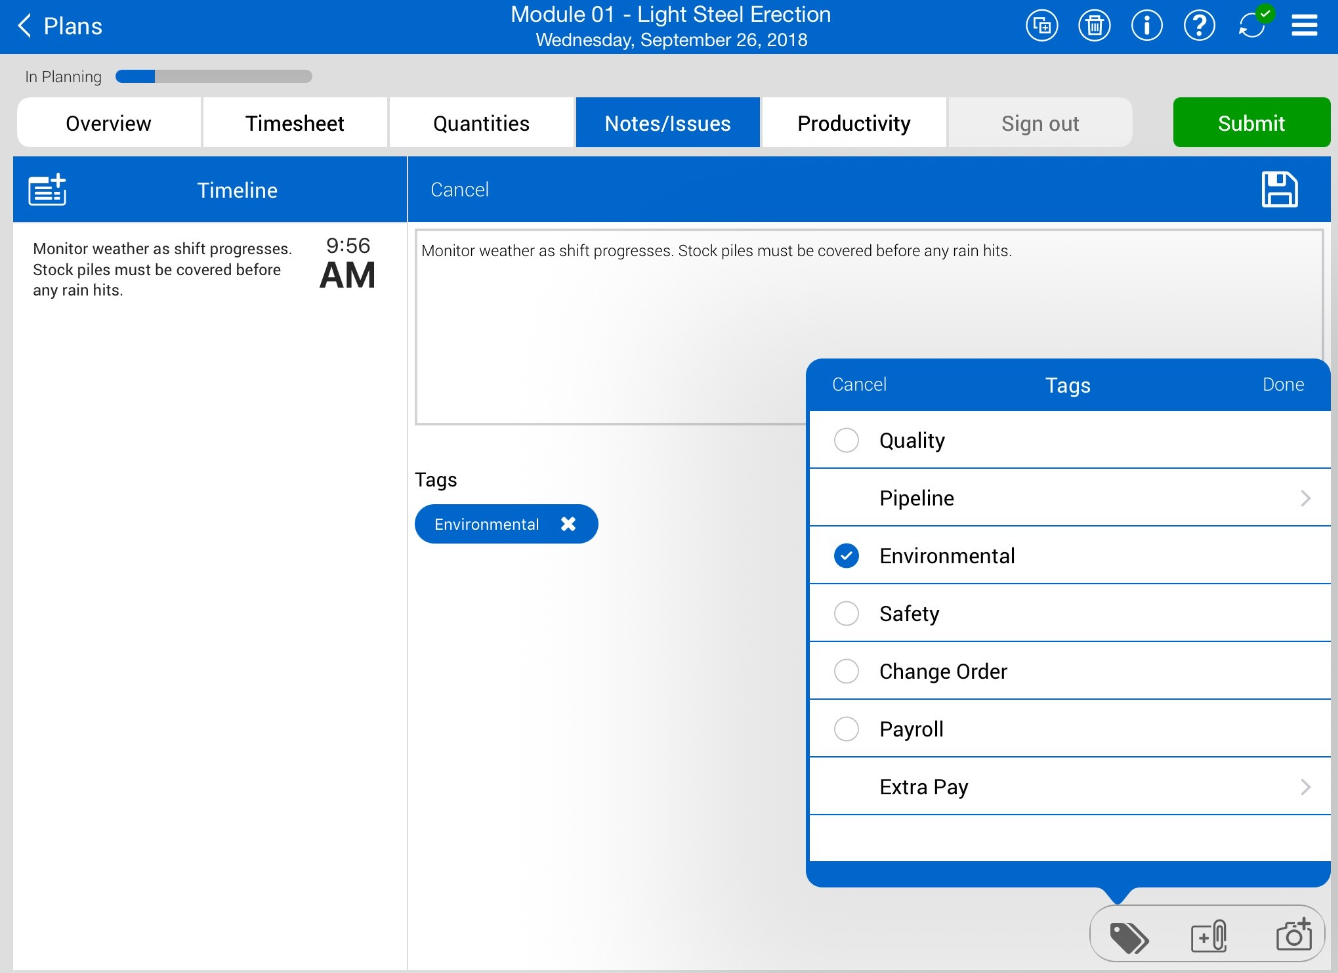
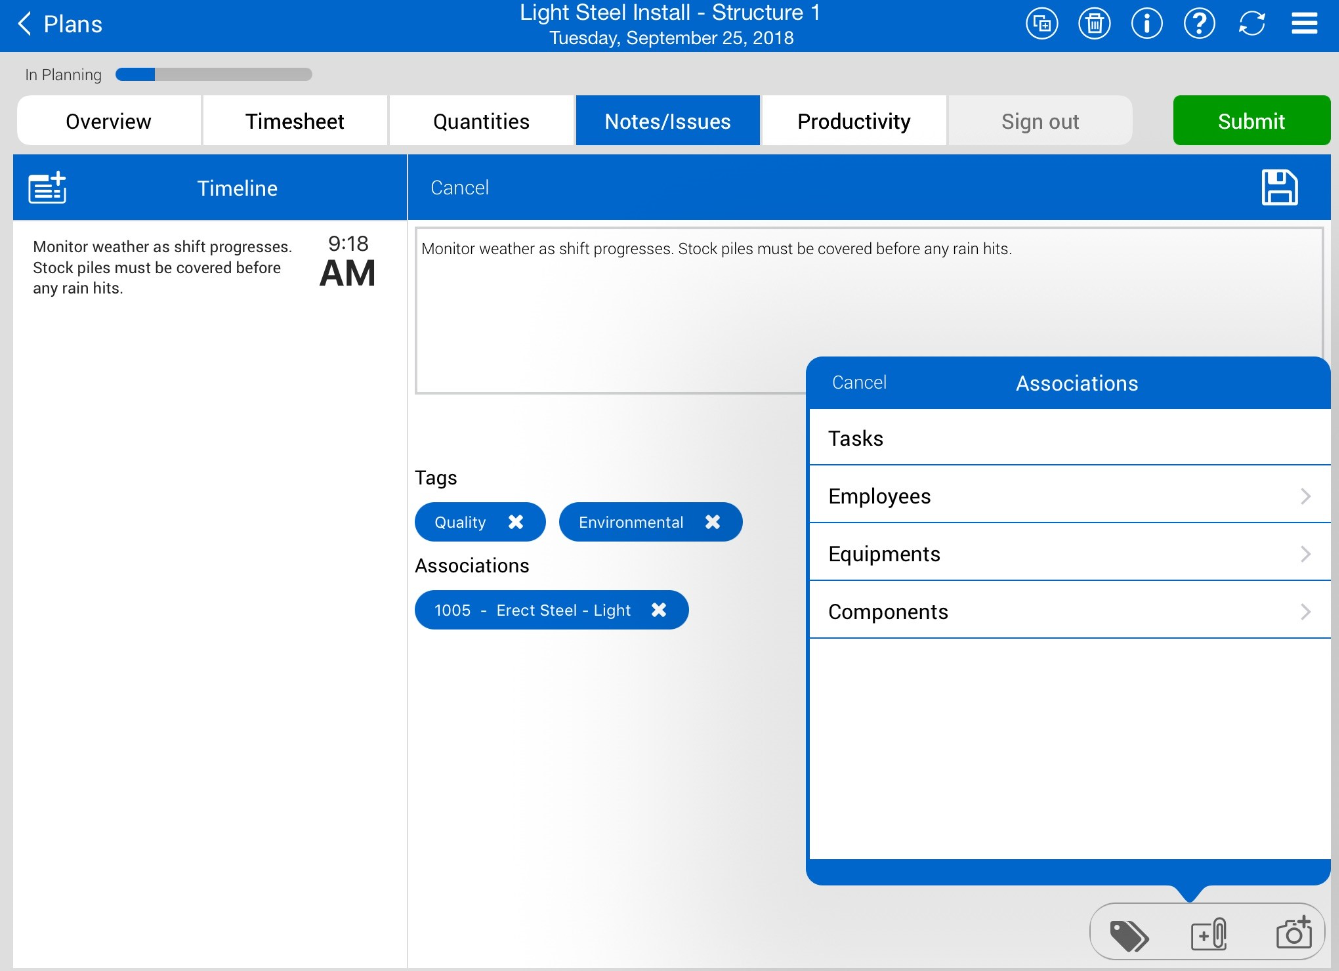
When you enter a note or issue, you can associate it with a tag, association and/or picture.
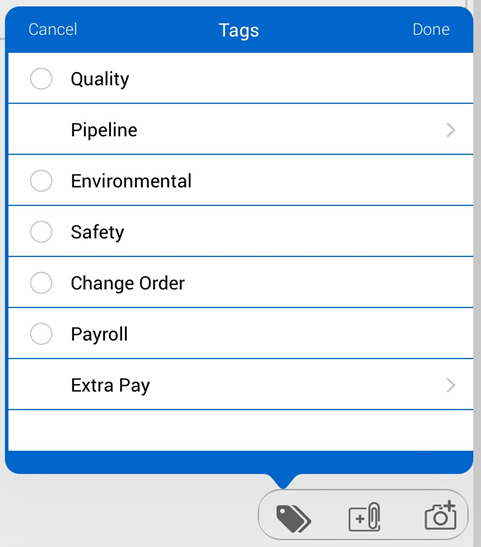
Tags and Associations
You can tag your notes to the following selections:
-
Safety
-
Quality
-
Environmental
-
Extra Work/Changes
-
Payroll
-
Production Notes
-
Change order request
Aside from tagging your notes/issues, you also can associate your notes to any of the following categories: Task, Employee, Equipment, Component, and Vendor. After you tap a category name, you can select an association.
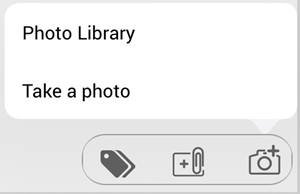
Adding and Editing a Picture
You can also add pictures to your notes/issues in the Planning Phase of your daily plan. You can either add a picture from your Photo Library or take one.
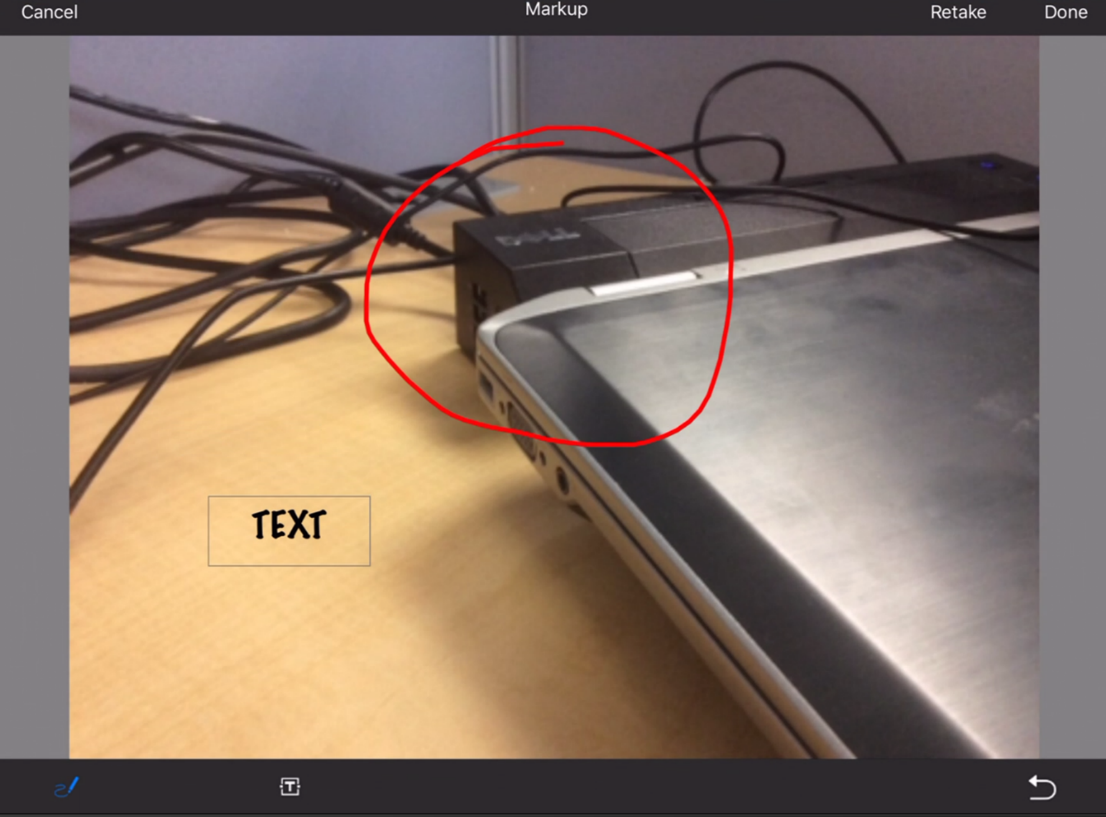
You can then add markups to your photos. You can use the pen icon, or you can add a text box.
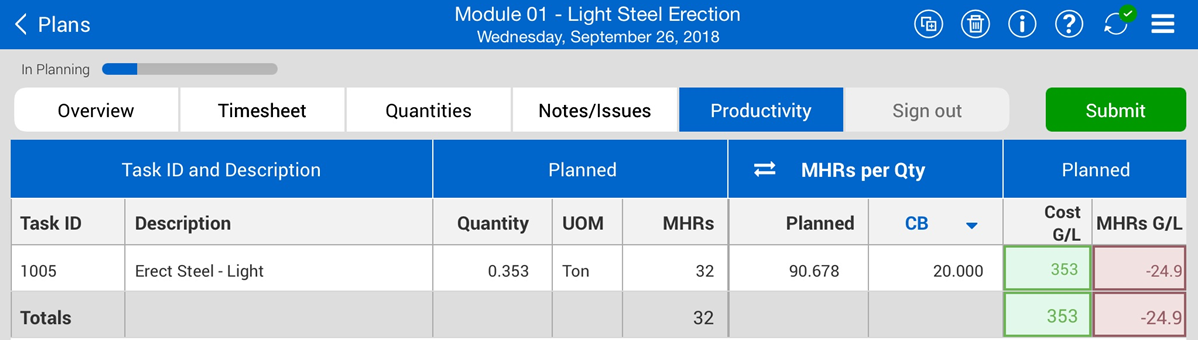
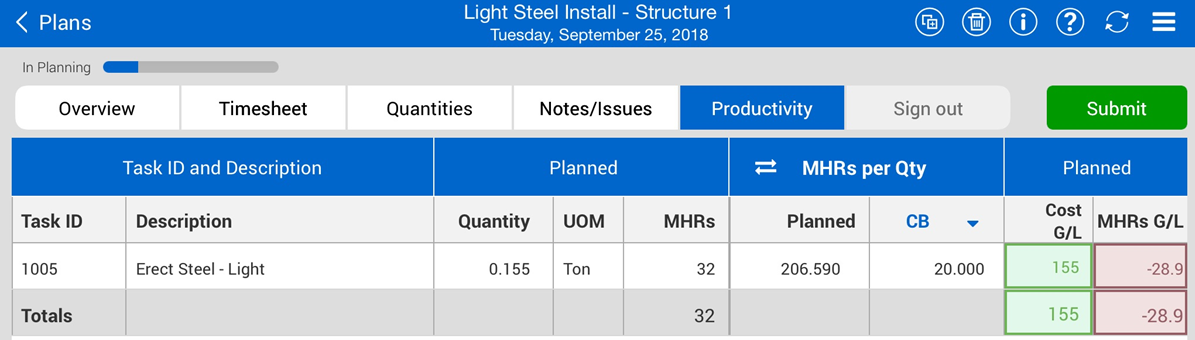
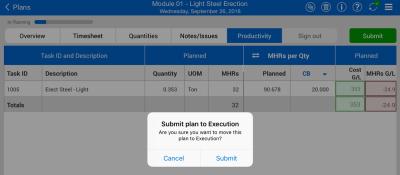
Productivity Tab
After planning your work within the Timesheet and Quantities tabs, you can view the quantities and man-hours within the Productivity tab.
On the Productivity tab, you can compare your planned quantities and man-hours against the budget. If there is an error for your planned quantities or man-hours, you can go back to the other tabs and revise.
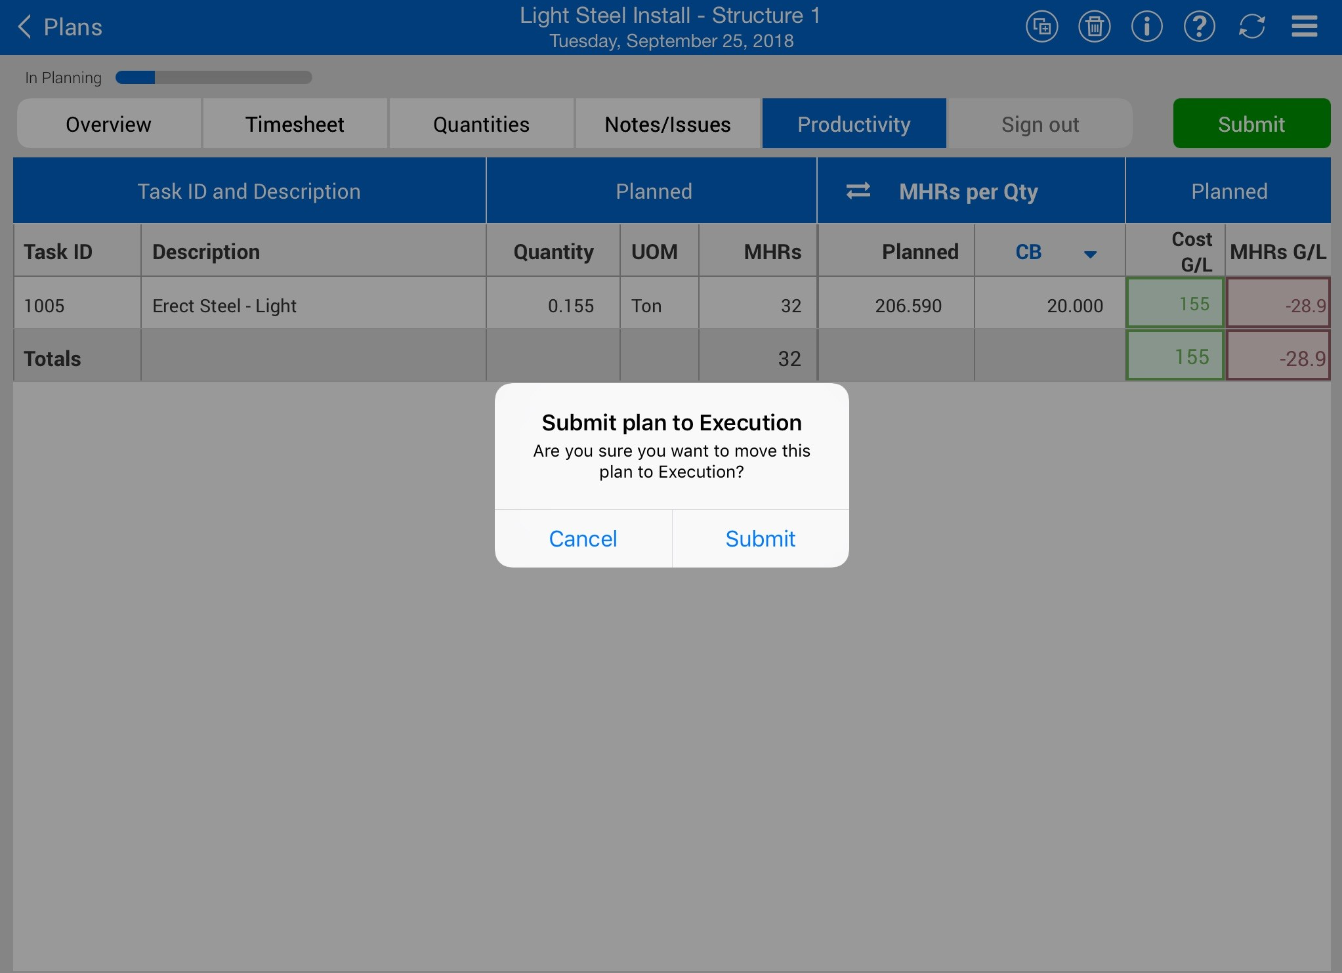
Submit and Sync Button
Once you are complete with reviewing the Daily plan that you put together, you can now Submit and Sync the information, which updates the information to other applications and users in InEight. The engineer or superintendent that oversees your daily plans will then review and either approve or reject the Daily plan.
Once you tap Submit, you can no longer edit the Daily plan in the planning phase. It will be moved into the Execution phase.
Create a Plan from Scratch Walk Through
The following steps will walk you through creating a daily plan from scratch.
Create a Daily Plan from Scratch
-
Log into the InEight Progress mobile application.
-
Select a project from the Projects home page.
-
Tap on the Add
button to create a plan from scratch.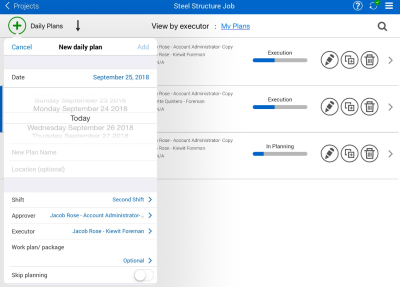
-
Choose a date for the daily plan.
-
Give a description in the Enter Plan Description field.
-
Enter a location in the Enter Location field.
-
Select a shift from the Job Shift menu.
-
Select an Approver.
-
Maximum of 2 selections. Usually an engineer and superintendent
-
-
Select an Executer.
-
Only one selection. Usually a foreman
-
-
Select Work Plan/Package.
-
Select a work plan or package for the daily plan and tap Back.
-
Tap Add to create a plan.
-
Tap the Add button in the Safety section of Tool box talks to add project safety concerns and mitigation.
-
Tap the Quality tab and add a quality concern and mitigation.
-
Tap Done to add the Tool Box Talk items to the Overview screen.
-
Tap on the Time sheet tab.
-
Tap on the Add button.
-
If not already selected, tap the Task button at the top.
-
Select a task (i.e. 1005 – Erect Steel Light).
-
You can perform a search to find the task or scroll through the list
-
-
Tap on the Employee tab, then tap select the employees you want to add.
-
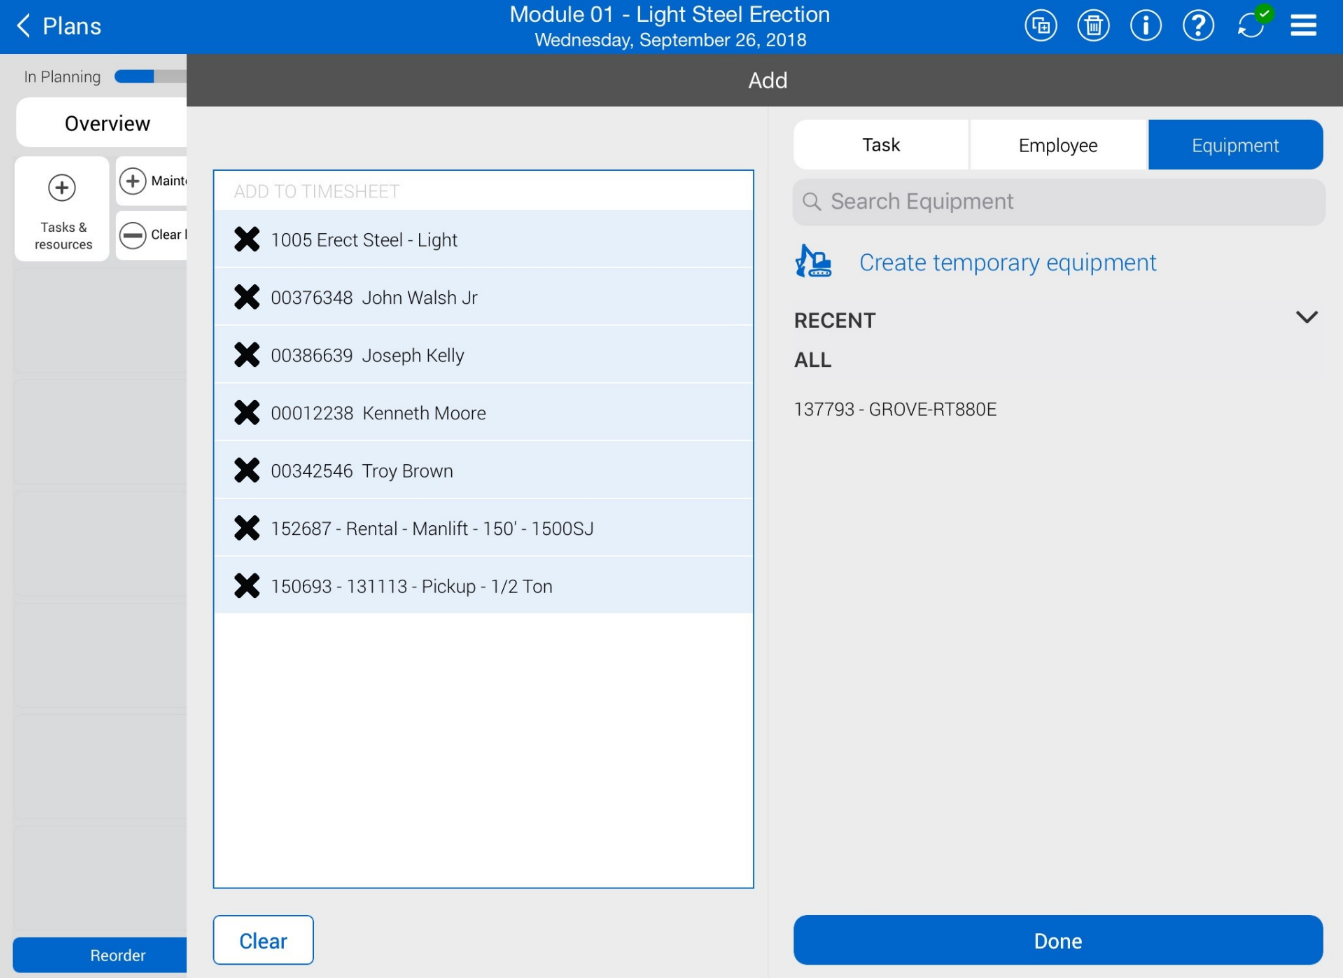
Tap on the Equipment tab, then select the equipment you want to add.

-
Tap Done.
-
You will see the task, employee, and equipment appear on the Timesheet tab
-
-
Add employee time by tapping on the empty box next to an employee name.
-
Add equipment time by tapping on the empty box next to a piece of equipment.
Check the box for “Apply hours to all equipment for the task” and then select Done to apply these hours to all of the equipment chosen for your daily plan.
-
Tap on the Quantities tab.
-
This opens the components section of each task
-
You can also input the planned quantity
-
-
Select your task (i.e. 1005 – Erect Steel Light).
-
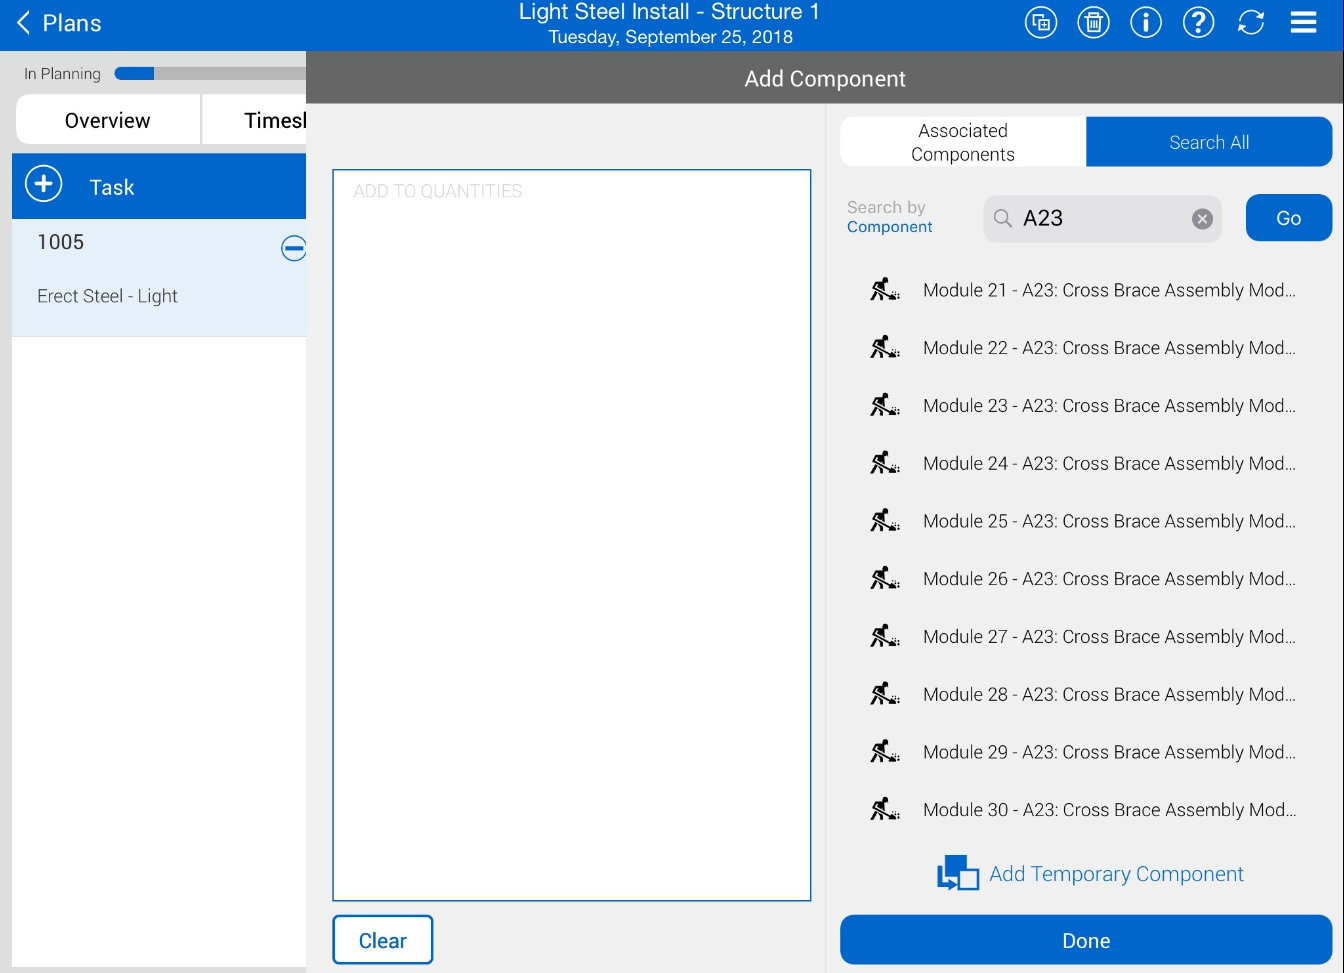
Tap the Add Components
 button.
 -
Then, tap on the Search All tab.
-
In the search bar, type in a keyword and select your components.
-
Tap Done to add the component to the quantities.
-
Check the check boxes in the Complete column as needed for your components or their broken down steps.
- By checking these boxes you are communicating to your crew that you expect these steps or components to be completed in the daily plan
-
Tap on the Notes/Issues tab.
-
Tap on the Add button and select Note to add any project notes.
-
Tap on the textbox field to bring up the keyboard on the iPad
-
Tap on the Tag
 icon to add any tags.
 - Tap on the Camera
 icon to take a photo, make markups, or add text.
 - Select Done.
-
Tap on the Productivity tab and review your daily plan.
-
Review the Planned Quantity, Planned MHRs, and Gain/Loss.
-
Tap the double arrows to flip between MHRs per Qty and Qty per MHRs
-
-
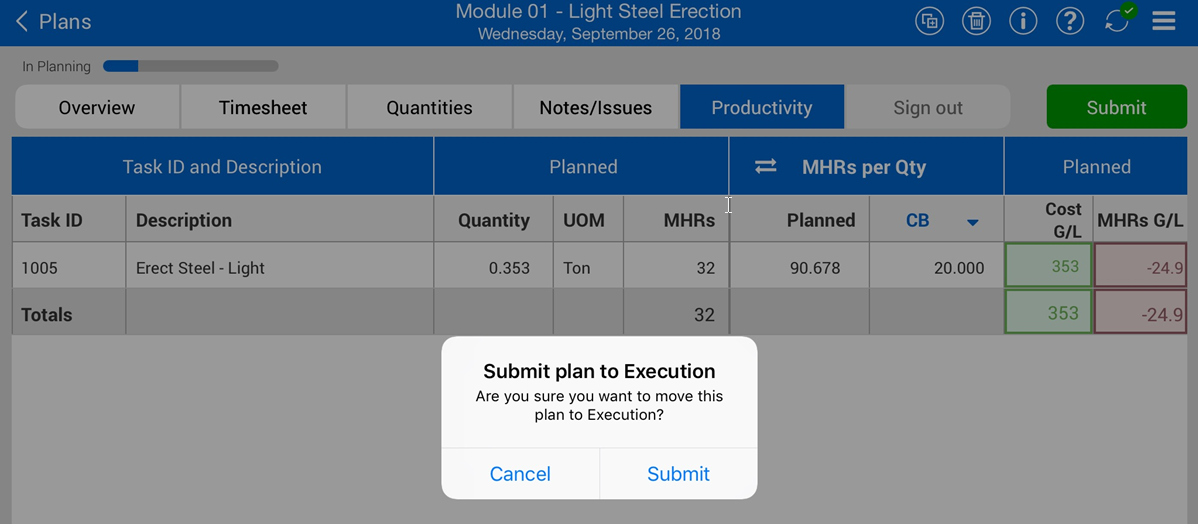
Tap on the Submit button.
-
Once you tap Submit, a window appears asking if you are sure that you want to move the plan into execution
-
-
Tap Submit again.
-
The application will automatically sync after submitting a plan to execution
Once you click submit, you will no longer be able to edit your plan. The only way to edit is to communicate with the engineer or superintendent to reject the plan or have them edit for you.
-

Check the box for “Apply hours to all employees for the task” and then select Done to apply these hours to all of the employees selected for this daily plan.
You can choose between straight time (ST), over time (OT), and double time (DT). Other premiums can be set within the project settings from the Progress web application.